Instructions
Step 1

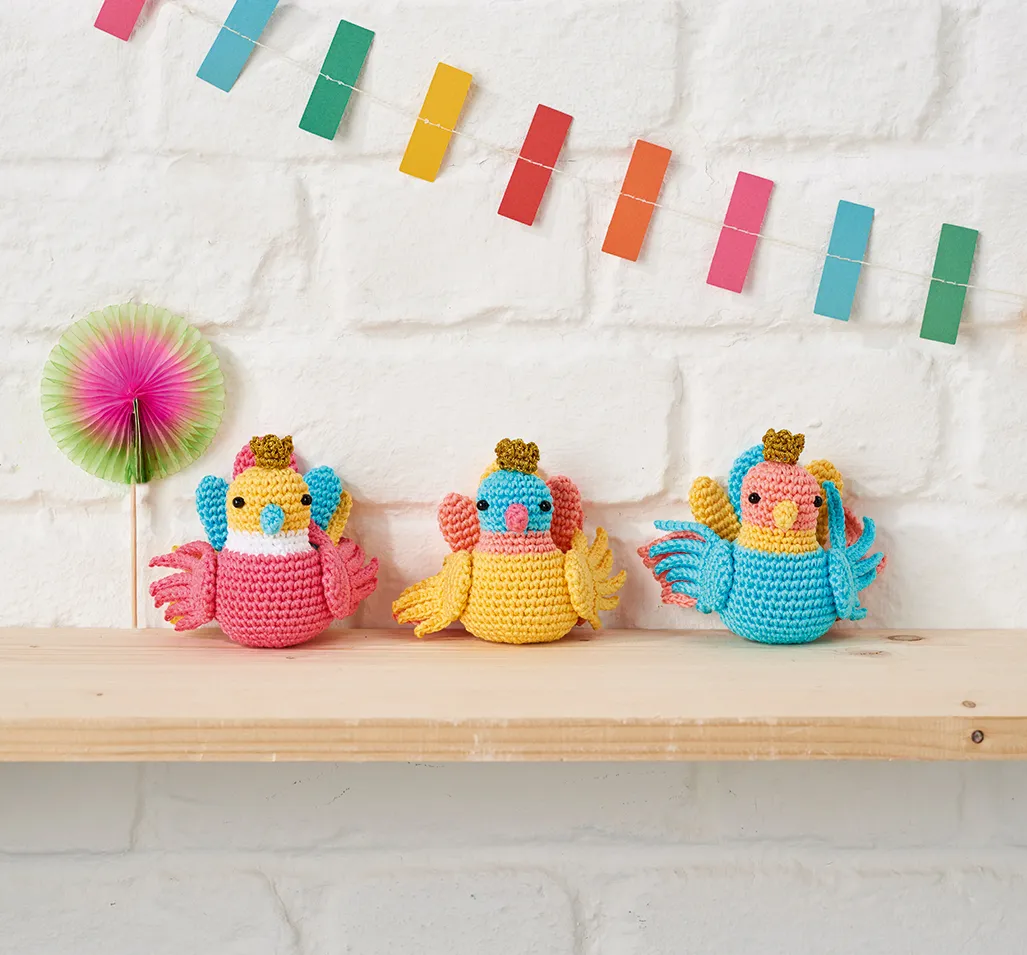
The pattern is worked using the amigurumi method. Work in a continuous spiral without closing the round. Use a stitch marker in the last stitch of each round, moving it up as you work. The pattern uses concise crochet, e.g. 6dc means work 1dc in each of the next 6 sts. The head and the body are worked as one piece, starting at the top of the head. All other pieces are made separately and sewn to the body. Each bird is worked using different colours, so refer to the key above.
Head and body
Step 1
Using the head colour, start with a crochet magic loop.
Round 1 ch1 (does not count as st), 6dc in ring, pull ring tight [6sts]
Round 2 inc in each st around [12sts]
Round 3 (inc, 1dc) 6 times [18sts]
Round 4 (inc, 2dc) 6 times [24sts]
Rounds 5-8 1dc in each st around [24sts]
Round 9 7dc, (1dc, dc2tog) 3 times, 8dc [21sts]
Change to the neck colour. Tie off head colour and leave in head cavity
Rounds 10-11 1dc in each st around [21sts]
Round 12 8dc, (inc, 1dc) 3 times, 7dc [24sts]
Change to the body colour. Tie off neck colour and leave in head cavity
Round 13 (1dc, inc) 3 times, 12dc, (inc, 1dc) 3 times [30sts]
Round 14 (2dc, inc) 3 times, 12dc, (inc, 2dc) 3 times [36sts]
Insert the safety eyes between Rounds 6 and 7 roughly 7sts apart. Stuff the head and continue stuffing the body as you go.
Round 15 1dc in each st around [36sts]
Round 16 (1dc, inc) 3 times, 24dc, (inc, 1dc) 3 times [42sts]
Rounds 17-21 1dc in each st around [42sts]
Round 22 (5dc, dc2tog) 6 times [36sts]
Round 23 (4dc, dc2tog) 6 times [30sts]
Round 24 (3dc, dc2tog) 6 times [24sts]
Round 25 (2dc, dc2tog) 6 times [18sts]
Round 26 (1dc, dc2tog) 6 times [12sts]
Round 27 (dc2tog) 6 times [6sts]
Fasten off, sew body closed and weave in any loose ends.
Beak
Step 1
Using the beak colour, start with a crochet magic loop.
Round 1 ch1 (does not count as st), 5dc in ring, pull ring tight [5sts]
Round 2 inc, 4dc [6sts] Round 3 inc, 5dc [7sts]
Fasten off leaving a long tail. Pinch the beak and sew it between Rounds 7 and 9 of the head.

Left wing
Step 1
Using the wing colour, start with a crochet magic loop.
Round 1 ch1 (does not count as st), 5dc in ring, pull ring tight [5sts]
Round 2 inc in each st around [10sts]
Round 3 (inc, 1dc) 5 times [15sts]
Rounds 4-6 1dc in each st around [15sts]
Flatten the piece and start working in rows. On the next row, you will work across the open top of the piece, working each st through both layers to close the top
Row 1 take out the hook from the loop, insert the hook into the next st (pic 2), grab the open loop with the hook (pic 3) and draw the loop through the sts (pic 4), ch1 (doesn’t count as first st), 1dc through both layers in each of 7 sts, turn [7sts]

Row 2 (first layer of feathers) ch5, ss in 2nd ch from hook, 1dc in each of next 3 ch, ss in FLO of next st of Row 1, ch6, ss in 2nd ch from hook, 1dc in each of next 4 ch, ss in FLO of next st of Row 1, ch7, ss in 2nd ch from hook, 1dc in each of next 5 ch, ss in FLO of next st of Row 1, ch8, ss in 2nd ch from hook, 1dc in each of next 6 ch, ss in FLO of next st of Row 1, ch9, ss in 2nd ch from hook, 1dc in each of next 7 ch, ss in FLO of next st of Row 1, ch10, ss in 2nd ch from hook, 1dc in each of next 8 ch, ss in FLO of next st of Row 1 Fasten off leaving a tail for sewing. Turn the work, start the second part of the wings changing to the second layer colour and working in the unused loops of Row 1.

Row 3-5 ch1, 1dc in each of next sts, turn [7sts]
Row 6 (second layer of feathers) ch5, ss in 2nd ch from hook, 1dc in each of next 3 ch, ss in next st of Row 5, ch6, ss in 2nd ch from hook, 1dc in each of next 4 ch, ss in next st of Row 5, ch7, ss in 2nd ch from hook, 1dc in each of next 5 ch, ss in next st of Row 5, ch8, ss in 2nd ch from hook, 1dc in each of next 6 ch, ss in next st of Row 5, ch9, ss in 2nd ch from hook, 1dc in each of next 7 ch, ss in next st of Row 5, ch10, ss in 2nd ch from hook, 1dc in each of next 8 ch, ss in next st of Row 5 Fasten off and weave in ends.


Right wing
Step 1
Work as left wing until Row 2
Row 2 (first layer of feathers) ch10, ss in 2nd ch from hook, 1dc in each of next 8 ch, ss in FLO of next st of Row 1, ch9, ss in 2nd ch from hook, 1dc in each of next 7 ch, ss in FLO of next st of Row 1, ch8, ss in 2nd ch from hook, 1dc in each of next 6 ch, ss in FLO of next st of Row 1, ch7, ss in 2nd ch from hook, 1dc in each of next 5 ch, ss in FLO of next st of Row 1, ch6, ss in 2nd ch from hook, 1dc in each of next 4 ch, ss in FLO of next st of Row 1, ch5, ss in 2nd ch from hook, 1dc in each of next 3 ch, ss in FLO of next st of Row 1 Fasten off leaving a tail for sewing. Turn the work and start the second part of wings, changing to the second layer colour and working in the unused loops of Row 1.
Row 3-5 ch1, 1dc in each of next 7 sts, turn [7sts]
Row 6 (second layer of feathers) ch10, ss in 2nd ch from hook, 1dc in each of next 8 ch, ss in next st of Row 5, ch9, ss in 2nd ch from hook, 1dc in each of next 7 ch, ss in next st of Row 5, ch8, ss in 2nd ch from hook, 1dc in each of next 6 ch, ss in next st of Row 5, ch7, ss in 2nd ch from hook, 1dc in each of next 5 ch, ss in next st of Row 5, ch6, ss in 2nd ch from hook, 1dc in each of next 4 ch, ss in next st of Row 5, ch5, ss in 2nd ch from hook, 1dc in each of next 3 ch, ss in next st of Row 5 Fasten off and weave in loose ends. Position the wings on the body with the long feathers upward, using the main image as a guide. Sew the wings between Rounds 14-20 of the body with hidden stitches around the main part of the wing.
Looking for more amigurmi inspiraition? Check out our round-up of the Best Amigurumi Crochet Books.
Tall (main part)
Step 1
Using the main tail colour, start with a crochet magic loop.
Round 1 ch1 (does not count as st), 5dc in ring, pull ring tight [5sts]
Round 2 inc in each st around [10sts]
Round 3 (inc, 1dc) 5 times [15sts]
Rounds 4-8 1dc in each st around [15sts]
Round 9 (3dc, dc2tog) 3 times [12sts]
Rounds 10-12 1dc in each dc around [12sts]
Round 13 (4dc, dc2tog) 2 times [10sts]
Rounds 14-15 1dc in each dc around [10sts]
Round 16 (3dc, dc2tog) 2 times [8sts]
Fasten off, leaving a tail for sewing.
Use this to attach the main tail between Rounds 18 and 20 on the back of the bird’s body.
Tail (side part, make 2)
Step 1
Using the side tail colour, start with a crochet magic loop.
Round 1 ch1 (does not count as st), 5dc in ring, pull ring tight [5sts]
Round 2 inc in each st around [10sts]
Rounds 3-6 1dc in each st around [10sts]
Round 7 (3dc, dc2tog) 2 times [8sts]
Rounds 8-10 1dc in each st around [8sts]
Round 11 (2dc, dc2tog) 2 times [6sts]
Round 12 1dc in each st around [6sts]
Fasten off, leaving a tail for sewing. Once both side tails have been crocheted, sew to the body either side of the main tail, making a few hidden stitches in between.
Crown
Step 1
Foundation using all six strands of the gold embroidery thread, ch12, ss into the 1st ch to form a ring
Round 1 ch1 (does not count as st), 1dc in each ch around, ss to top of the 1st dc to join [12sts]
Round 2 (ch1, 1tr in next st, ch1, ss into the side of the tr, ss in next st) 6 times
Fasten off, leaving a tail for sewing. Use this to attach the crown onto the bird’s head, using the main image as a guide to placement.