How to make crochet bunny bunting
Nothing says Easter quite like adorable bunnies (well, except for chocolate eggs maybe), so we're bringing you two fabulous crochet patterns to fill your home with spring-time bunny bunting!
Our first easy crochet bunny bunting by Laura Maxwell is super simple, and it looks absolutely fabulous. Perfect for a baby's bedroom or as a cheerful easter decoration, it's a great project for practising how to crochet in the round.
Once you know how to make easy crochet bunny bunting, why not try taking it a step further with our other free Easter crochet bunny bunting pattern further down this page, which you can customise with your own message.
You will need
Paintbox Simply DK, 100% acrylic, 100g/276m per ball, or similar aran-weight yarn. One ball each in:
- Light Pink
- White
- Light Green
- Light Yellow
5mm (UK 6, US H/8) crochet hook
Tapestry needle for sewing ends
Abbreviations (UK)
dtr (double treble) - yrh twice, insert hook into stitch, yrh, pull through stitch (4 loops on hook), yrh, pull through 2 loops (3 loops on hook), yrh, pull through 2 loops (2 loops on hook), yrh, pull through remaining 2 loops.
You can find a full list of all abbreviations we use in our abbreviations and conversions guide. This free bunny bunting crochet pattern is written in UK terminology, but you can easily convert it to US terms using the guide.
Tension
Tension isn’t important for this project – just aim for a firm finish.
Notes
The easy crochet bunny shapes are made in one piece. The body is made first in the round, then the head and ears are added, then the tail is made separately and sewn on.
Finished size
Approx. 8cm (31/8″) tall
DIY easy crochet bunny bunting
Making the body
Step 1
Round 1 Using pink, yellow or green yarn, start with a magic ring. ch1, 6dc into the ring and close the ring tightly by pulling the loose end, ss to 1st dc to join [6dc]
Round 2 ch1 (does not count as st), 2dc in each st around, ss to 1st dc to join [12dc]
Round 3 ch1 (does not count as st), *1dc in next st, 2dc in next st; repeat from * to end of round, ss to 1st dc to join [18dc]
Round 4 ch1 (does not count as st), *1dc in each of next 2 sts, 2dc in next st; repeat from * to end of round, ss to 1st dc to join [24dc]

Step 2
Round 5 ch1 (does not count as st), (1htr, 1dtr) in next st, 2dtr in each of next 2 sts, (1dtr, 1htr) in next st, ss into each remaining st around. Do not ss to join.

Step 3
Round 6 ss into 1st htr and first dtr from Round 5, *ch5, 1htr in 2nd ch from hook, 1tr in each of next 3ch, miss 2dtr, ss in next st; repeat from * once more. ss in each of next 2 sts. Break yarn and fasten off, leaving a long tail of yarn. Using the long tail sew the ears to the head firmly by working up and down the sts at the back of each ear. Weave in ends.

Making the tail

Using white yarn, ch2, work a 4-tr cluster in 2nd ch from hook, ch1. Break yarn and fasten off. Sew to centre of body and weave in ends to finish.

Hang up your easy crochet bunny bunting for Easter or in a little one's room for some cute decor. We hope you’ve liked this tutorial on how to make easy crochet bunny bunting. If you fancy some more fun Easter makes, check out our tutorial on how to make a crochet egg cosy, or take a look at our list of 50+ Free Easter crochet patterns
Free Easter bunny bunting crochet pattern

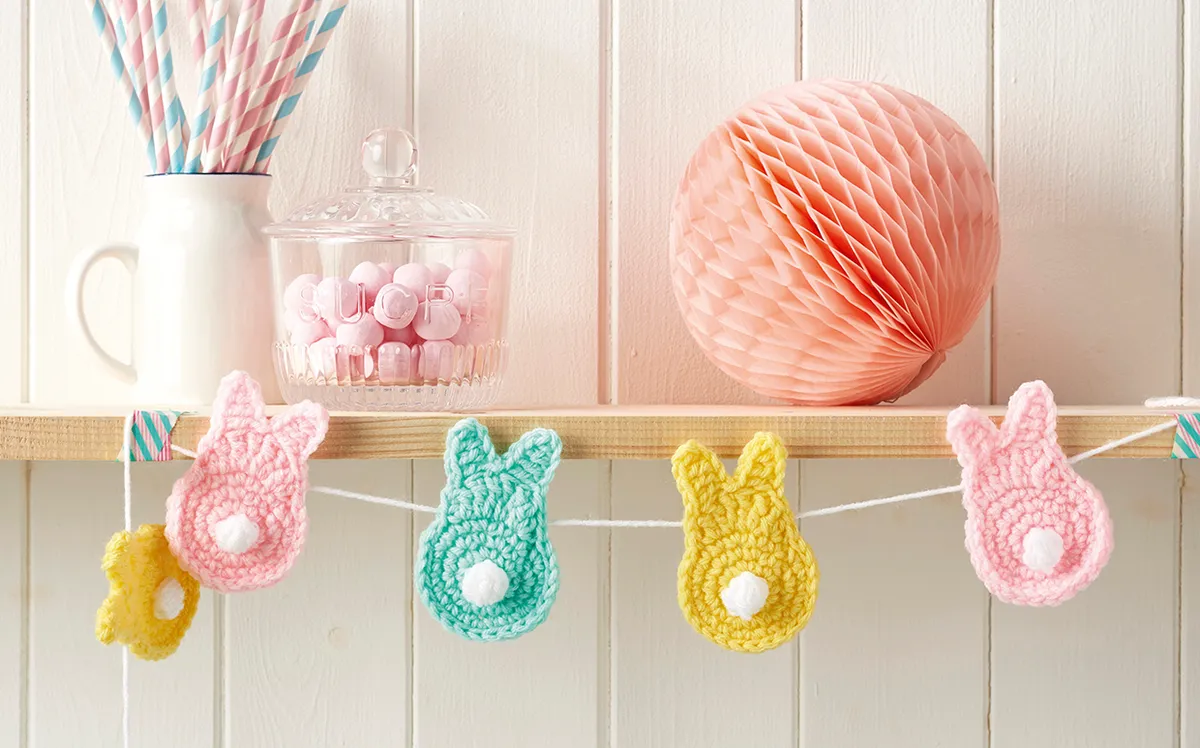
If you’re looking for the perfect Easter crochet project, then this bunny bunting by Louise McCarney is a must-make! Made with some clever construction and some neat edging to really show off the shapes, this crochet bunny bunting is topped off with some felt letters to spell out any message you like – although Happy Easter is the obvious choice! This crochet bunny bunting pattern originally appeared in issue 42 of Simply Crochet magazine, but it’s so adorable we thought we’d let you have the pattern for free!
You will need
- DMC Natura Just Cotton (100% cotton, 50g/155m), 1 ball of each:
- Ivory (N02)
- Ombre (N39)
- Pistache (N13)
- Rose Soraya (N32)
- Safran (N47),
- Tournesol (N16)
- Turquoise (N49)
- A 3mm (US C/2 or D/3) hook
- A small amount of stuffing
- A sharp craft knife
- Piece of white felt (A4)
- Fabric glue
Measurements
Rabbit Motif measures 12x8cm (4¾x3in)
Carrot measures 8cm (3in) high
Abbreviations
You can find a full list of all abbreviations we use in our abbreviations and conversions guide. This free easter bunny crochet pattern is written in UK terminology, but you can easily convert it to US terms using the guide.
Notes
The Body, Head and Ears of the rabbit are worked as one piece and edged with a border.
Make 3 Rabbit Motifs in Tournesol and 2 in each of Pistache, Safran, Rose Soraya and Turquoise.
Make 4 carrots, one for each end of each piece of bunny bunting.

Rabbit Motif (Make 11)
Body
Using chosen colour, make a crochet magic loop.
Round 1 (RS) Ch1 (does not count as st throughout), 6dc into the loop, ss to first dc to join. [6 sts]
Round 2 Ch1, 2dc in each st around, ss to first dc. [12 sts]
Round 3 Ch1, *dc in next st, 2dc in next st, dc in next st**, 2htr in each of next 2 sts, htr in each of next 2 sts, 2htr in each of next 2 sts; rep from * to **, ss to first dc. [10 htr, 8 dc]
Round 4 Ch1, dc in next st, 2dc in next st, dc in each of next 2 sts, *2htr in next st, htr in next st, 2htr in next st**, dc in each of next 4 sts; rep from * to **, dc in each of next 2 sts, 2dc in next st, dc in next st, ss to first dc. [14 dc, 10 htr]
Round 5 Ch1, dc in each of next 2 sts, 2dc in next st, dc in next st, 2dc in next st, dc in each of next 2 sts, *htr in next st, 2htr in next st, htr in next st**, dc in each of next 4 sts; rep from * to **; rep from beg to *, ss to first dc. [22 dc, 8htr]
Round 6 Ch1, dc in each of next 2 sts, 2dc in next st, dc in each of next 4 sts, 2dc in next st, dc in next st, htr in each of next 3 sts, 2dc in next st, dc in each of next 4 sts, 2dc in next st, htr in each of next 3 sts, dc in next st, 2dc in next st, dc in each of next 4 sts, 2dc in next st, dc in each of next 2 sts, ss to first dc. [30 dc, 6 htr]
Round 7 Ch1, dc in each of next 3 sts, 2dc in next st, dc in each of next 5 sts, 2dc in next st, dc in next st, htr in each of next 4 sts, 2dc in next st, dc in each of next 4 sts, 2dc in next st, htr in each of next 4 sts, dc in next st, 2dc in next st, dc in each of next 5 sts, 2dc in next st, dc in each of next 3 sts, ss to first dc. [34 dc, 8 htr]
Round 8 Ch1, dc in each of next 3 sts, 2dc in next st, dc in each of next 6 sts, 2dc in next st, dc in each of next 2 sts, htr in each of next 4 sts, 2dc in next st, dc in each of next 6 sts, 2dc in next st, htr in each of next 4 sts, dc in each of next 2 sts, 2dc in next st, dc in each of next 6 sts, 2dc in next st, dc in each of next 3 sts, ss to first dc. [40 dc, 8 htr]
Head
Ch2, ss in st at base of ch, turn.
Row 1 Ch1, 6dc in ch-2 sp, ss in same ch-2 sp, ss in next st on Body, turn. [6 sts]
Row 2 2dc in each of next 6 dc, ss in each of next 2 sts on Body, turn. [12 sts]
Row 3 *dc in next dc (skipping slip sts), 2dc in next dc; rep from * another 5 times, ss in each of next 2 sts on Body, turn. [18 sts]
Row 4 *dc in each of next 2 dc (skipping slip sts), 2dc in next dc; rep from * another 5 times, ss in each of next 2 sts on Body, turn. [24 sts]
Row 5 (dc in each of next 3 dc [skipping slip sts], 2dc in next dc) twice, dc in next dc, turn, **ch1, dc in each of next 2 sts, turn, ch1, 2dc in each of next 2 sts, turn, ch1, *dc in each of next 4 sts, turn; rep from * another 4 times, (dc2tog) twice, ss evenly down side of ear***, dc in each of next 2 sts on Head, 2dc in next st, dc in each of next 4 sts, turn; rep from ** to ***, dc in same st as previous dc on Head, (dc in each of next 3 sts, 2dc in next st) twice, ss in next st on Body. Fasten off.
Join Ivory with a ss to any st and dc evenly around the edge (skipping corners to keep the shape correct), ss to the first dc to join. Fasten off and weave in ends.
To prevent the edges of the bunny motifs from curling, hold a steam iron over the motif and press the steam button 5 or 6 times (do not put the iron directly onto the motif, as this may ruin the fabric). Pin each bunny flat and leave to dry completely. Alternatively, spray each motif with cold water or spray starch, pin flat and leave to dry.

Carrot Side (Make 2 per carrot)
Using Safran, ch8.
Row 1 Ch1 (does not count as st throughout), dc in second ch from hook and in each ch to end, turn. [8 sts]
Row 2 Ch1, 2dc in next st, dc in each of next 6 sts, 2dc in next st, turn. [10 sts]
Row 3 Ch1, dc in each st to end, turn.
Rows 4-5 As Row 3.
Row 6 Ch1, dc2tog, dc in each of next 6 sts, dc2tog, turn. [8 sts]
Rows 7-9 As Row 3.
Row 10 Ch1, dc2tog, dc in each of next 4 sts, dc2tog, turn. [6 sts]
Rows 11-12 As Row 3. Row 13 Ch1, dc2tog, dc in each of next 2 sts, dc2tog, turn. [4 sts]
Row 14 As Row 3.
Row 15 Ss in first st, dc in each of next 2 sts, ss in next st. [2 sts]
Fasten off, leaving a long tail for sewing up.
Carrot Top (Make 1 per carrot)
Using Pistache, ch4.
Row 1 Ch1, dc in second ch from hook and in each ch to end, turn. [4 sts]
Row 2 Ch5, dc in second ch from hook and in each of next 3 ch, ss in next st, ch7, dc in second ch from hook and in each of next 5 ch, ss in next st, ch6, dc in second ch from hook and in each of next 4 ch, ss in next st, ch4, dc in second ch from hook and in each of next 2 ch, ss in st at base of ch.
Fasten off and weave in ends.
To Make Up Carrot
Place 2 pieces of carrot together with WS facing and RS outermost. Sew tog starting at one corner – when you’re halfway around, begin stuffing. When you reach the top, join Top of Carrot to Carrot through the top-middle 4 sts of both pieces.
Cord
Make 2 cords measuring just under 1m. Using Ombre, ch desired amount. Row 1 Htr in third ch from hook and in each ch to end. Fasten off and weave in ends.
To Finish
Carefully draw and cut out the words ‘HAPPY EASTER’ using a craft knife and white felt. Glue these letters to the front stomach of each bunny, using the images as a guide. Glue each bunny, by its ears, to the cord, approx 2cm (¾in) apart. Glue a carrot at each end of both words. Be sure to leave enough cord at each end to hang your bunny bunting.
Whip up a bunting for Easter
Our two easter crochet bunting patterns will brighten up your home, ready for the celebrations.
Try making your own Easter bunny pattern
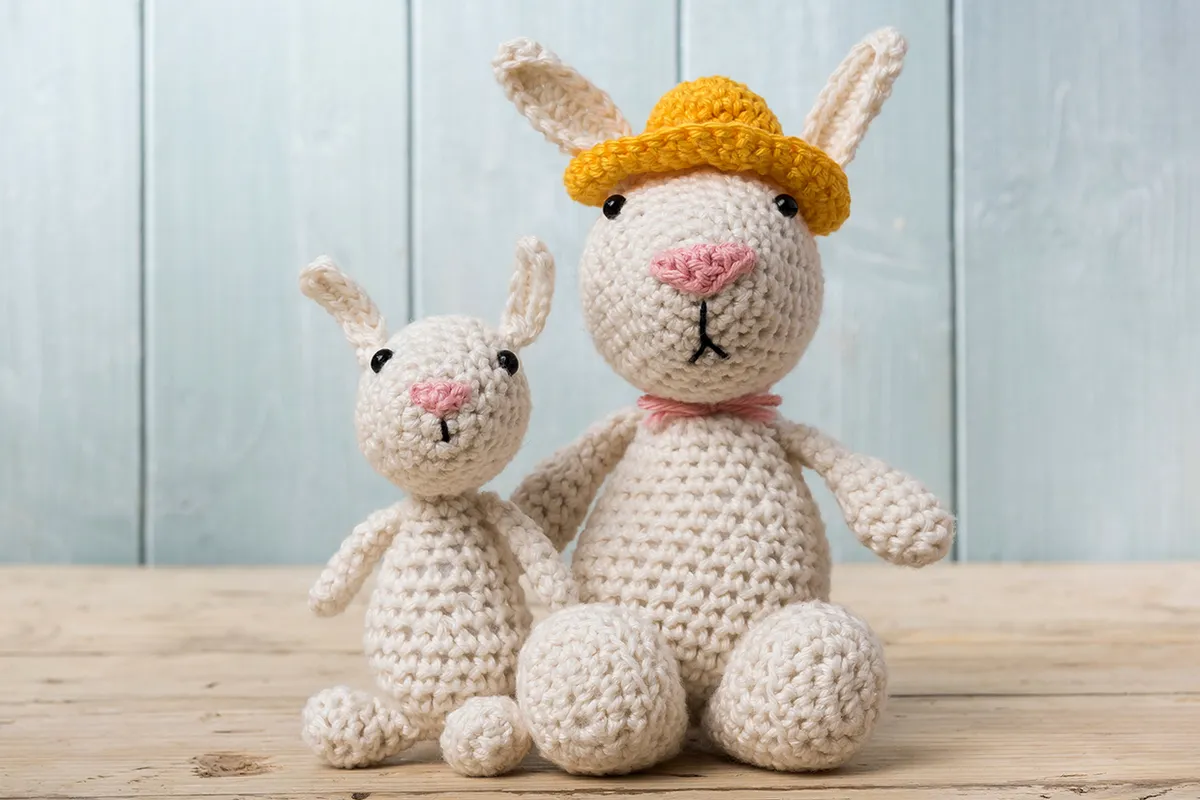
Now that you’ve got your home fully decked out in Easter bunny bunting, why not hook up a special gift for your little ones, with the help of our free amigurumi rabbit pattern? It includes instructions for an adult and child bunny, plus Easter accessories like a sweet bonnet, egg basket… and of course a tasty carrot!