Bucket hats are all the rage right now and we’re even seeing crochet bucket hats having their own surge in popularity. While many of us will remember them as a distinctly 90s fashion item, they’ve found a fresh new audience with the youth of today.
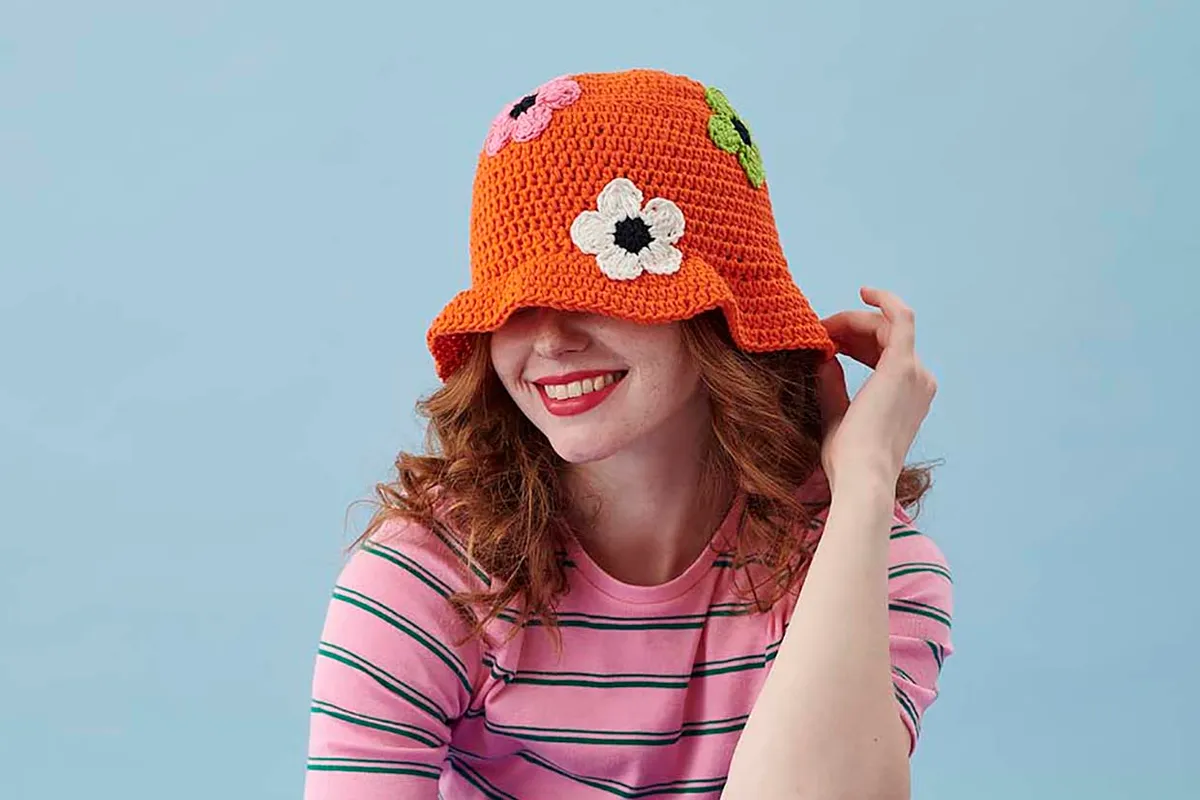
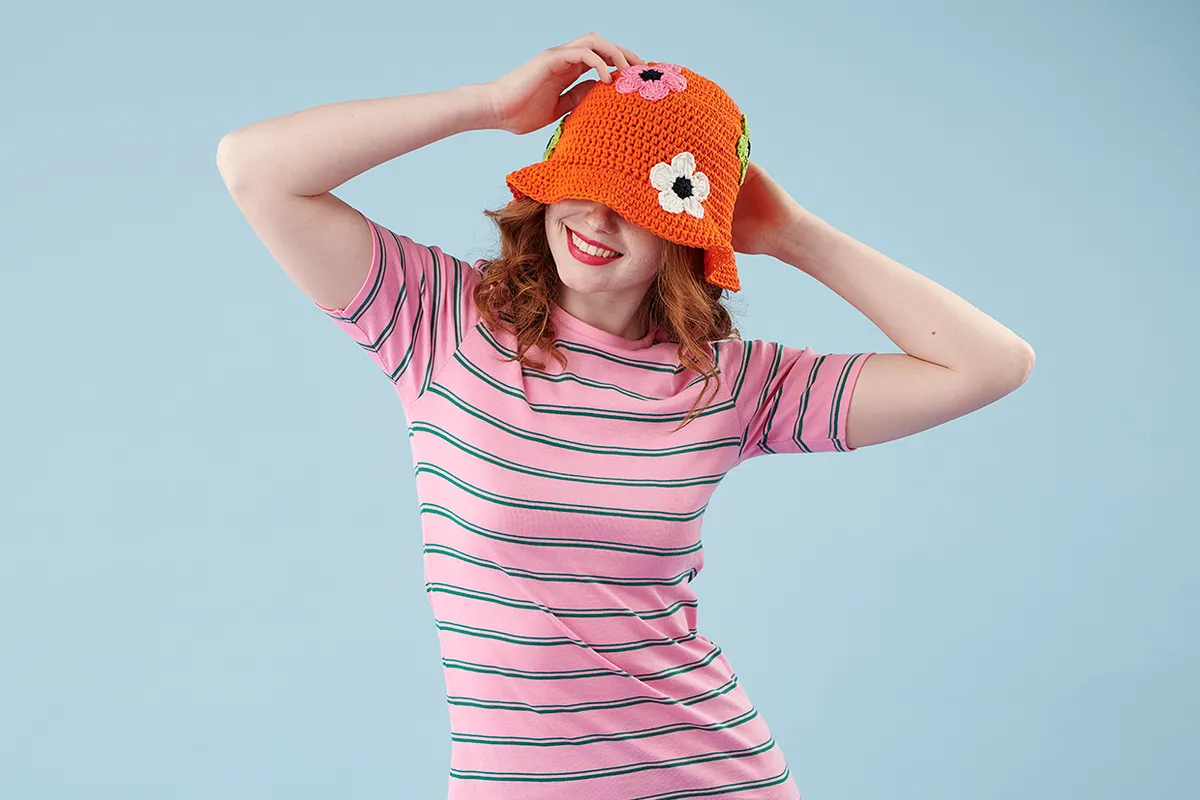
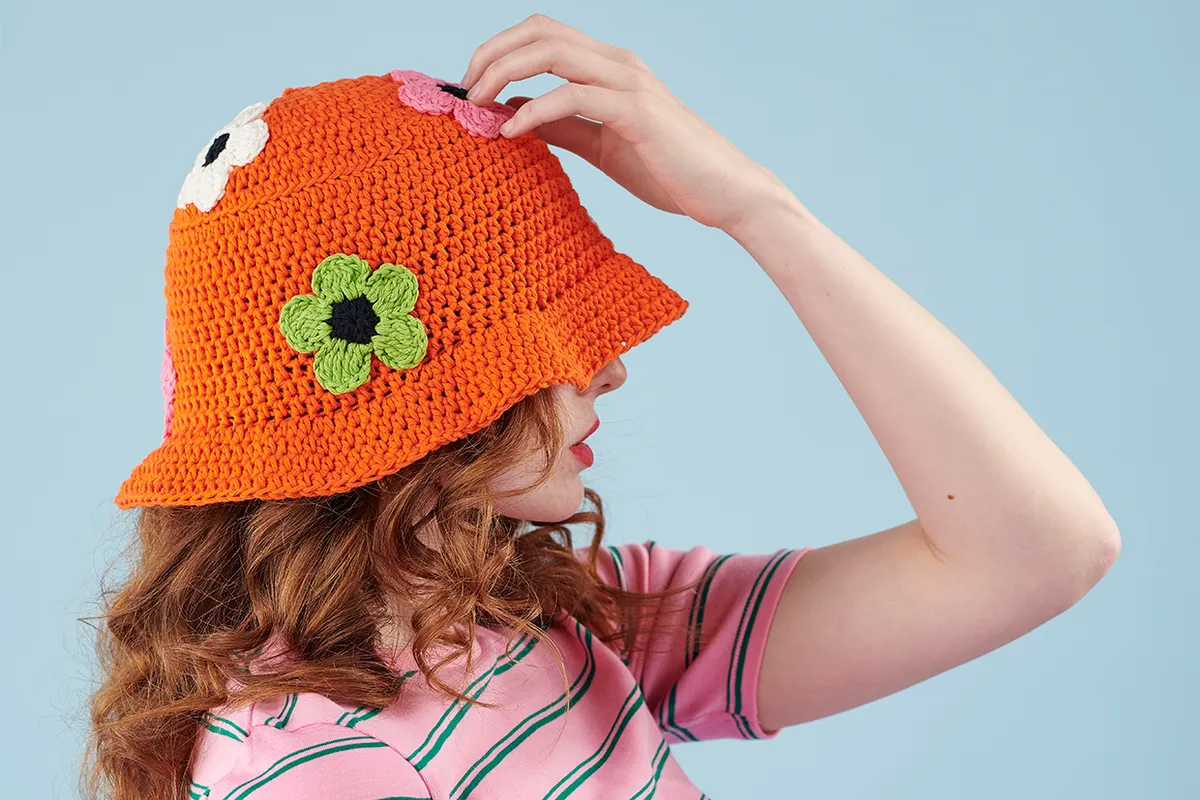
We love these funky hats so much that we’re bringing you two fantastic free bucket hat crochet patterns to try! Our first crochet bucket hat pattern is made up of simple stitches and is adorned with optional retro crochet flowers, making it a great pattern for beginners to try.
If you’re already a whiz with a crochet hook and fancy something a bit more challenging, our second free bucket hat crochet pattern is made up using classic granny squares as well as a range of fun colours and stitches.
How to crochet a bucket hat
Making a crochet bucket hat is relatively straightforward, as it’s all made in one piece, working from the top of the hat downwards. You start by making the crown followed by the sides, finishing off with the brim.
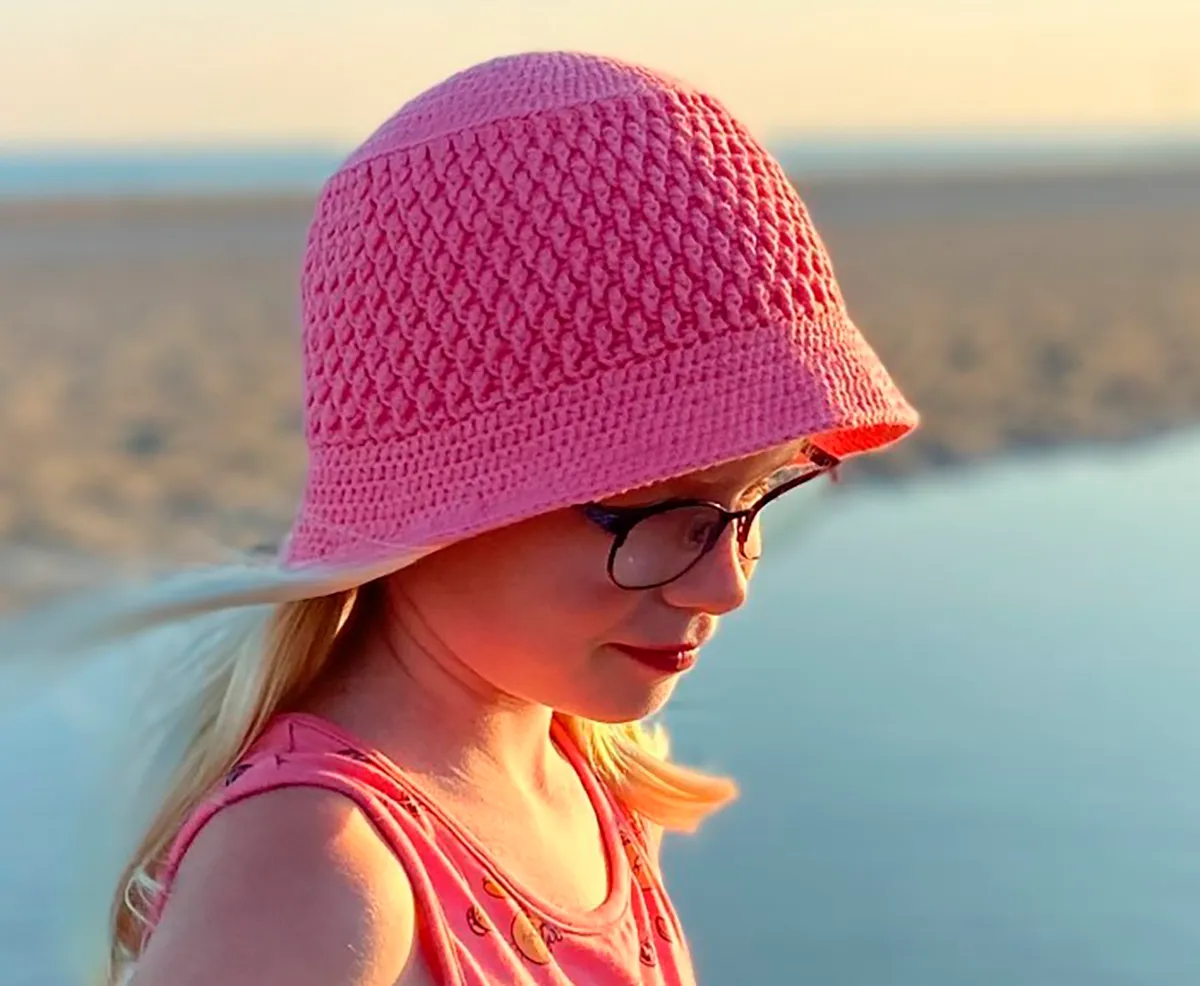
This first free crochet bucket hat pattern by Taome Tucker uses simple stitches that most intermediate crocheters will be familiar with (we’ve included links to our stitch tutorials if you’re unfamiliar with any of them). You will also need to know how to crochet in the front and back loops, as this will help you to shape elements of your hat such as the brim.
We’ll also be making this crochet bucket hat in continuous rounds, where you don’t join with a slip stitch at the end of a round (often called the amigurumi method of crochet in the round). We’d highly recommend using a stitch marker to mark the end of each round and move it up as you work.
You can find a full list of all abbreviations we use in our abbreviations and conversions guide. This crochet bucket hat pattern is written in UK terminology but you can easily convert it to US terms using the guide.
Sizing information for this bucket hat crochet pattern
This finished crochet bucket hat measures approximately 37cm wide by 24cm high (14⅝ x 9.5in).
To check your tension, make the first five rounds of half treble crochet (48 stitches) which should produce a 10cm (4") diameter circle using a 4.5mm hook. If you get to this point and your circle is too small, try increasing to a slightly larger hook size and starting again (and vice versa if it’s too large).
What do you need to make this free crochet bucket hat pattern
For the crochet bucket hat you will need:
Paintbox Yarns Cotton Aran (100% cotton, 50g/85m per ball) or alternative Aran yarn, two balls in Blood Orange (620) (Yarn A) for the crochet bucket hat.
4.5mm (UK 7, US 7) crochet hook
To make the optional flowers you will also need
Paintbox Yarns Cotton Aran (100% cotton, 50g/85m per ball) or alternative Aran yarn, one ball each in Pure Black (602) (Yarn B), Lime Green (629) (Yarn C), Champagne White (603) (Yarn D) and Bubblegum Pink (651) (Yarn E)
Free crochet bucket hat pattern
Start by making the crown of your bucket hat
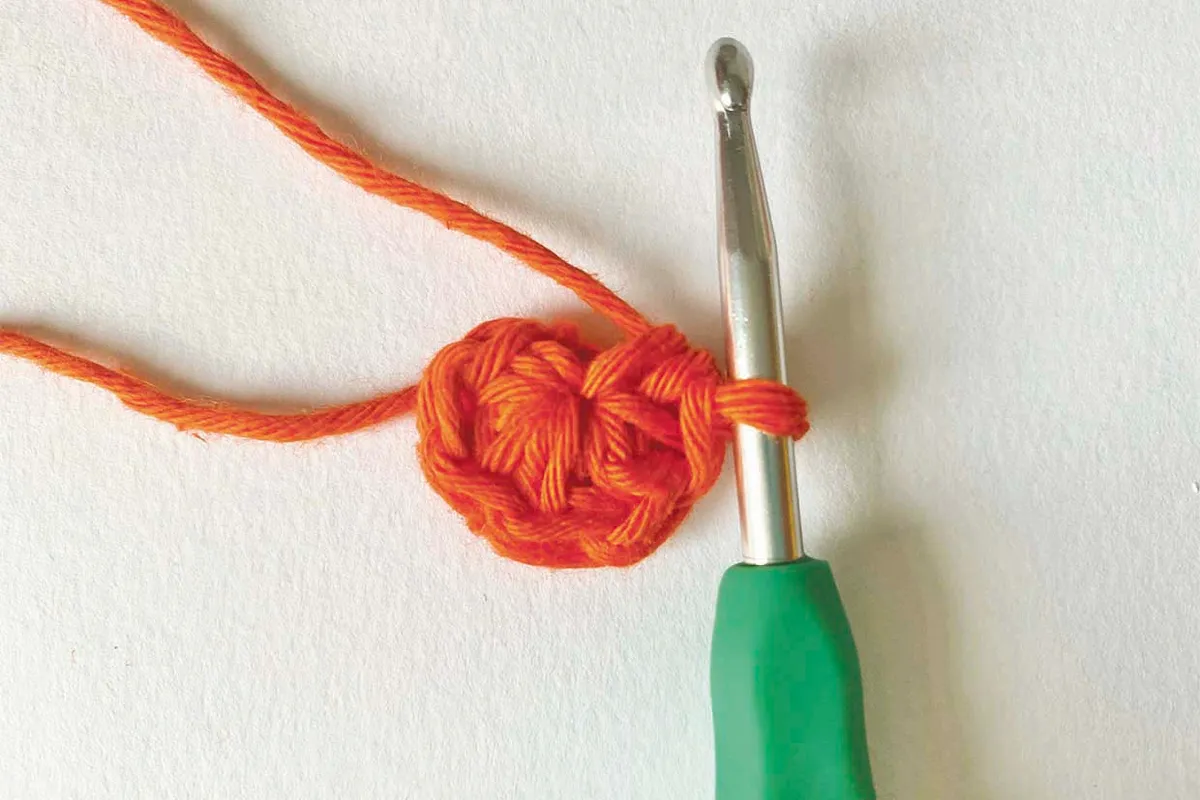
Using Yarn A, start with a magic ring (alternatively, you can chain 4 and join with a slip stitch to form a ring).
Round 1 Ch1, 1 double crochet (dc) and 5 half treble crochet (htr) in ring, pull ring tight to close. [6 sts]
Round 2 2htr in each stitch (st) around. [12 sts]
Round 3 repeat Round 2. [24 sts]

Round 4 *1htr in next st, 2htr in the next st; repeat from * to end of round. [36 sts]
Round 5 *1htr in each of next 2 sts, 2htr in the next st; repeat from * to end of round. [48 sts]
Round 6 *1htr in each of next 5 sts, 2htr in the next st; repeat from * to end of round. [56 sts]
Round 7 1htr in each of next 3 sts, 2htr in the next st, *1htr in each of next 6 sts, 2htr in the next st; repeat from * to last 3 sts, 1htr in each of last 3 sts. [64 sts]
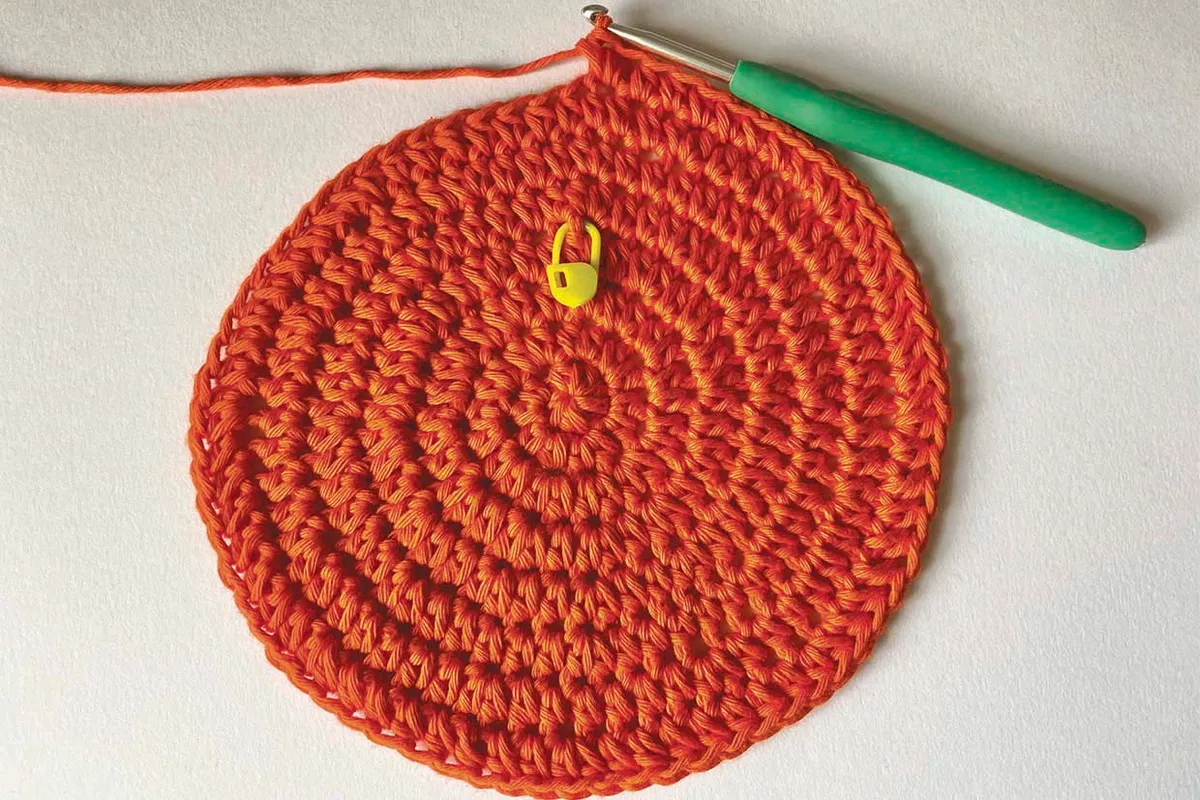
Round 8 *1htr in each of next 7 sts, 2htr in the next st; repeat from * to end of round. [72 sts]
Round 9 1htr in each of next 4 sts, 2htr in the next st, *1htr in each of next 8 sts, 2htr in the next st; repeat from * to last 4 sts, 1htr in each of last 4 sts. [80 sts]

Now we’re going to start making the sides of our hat
Round 10 work this round through the back loop only (BLO), 1htr in each st around.
Round 11-20 1htr in each st around.
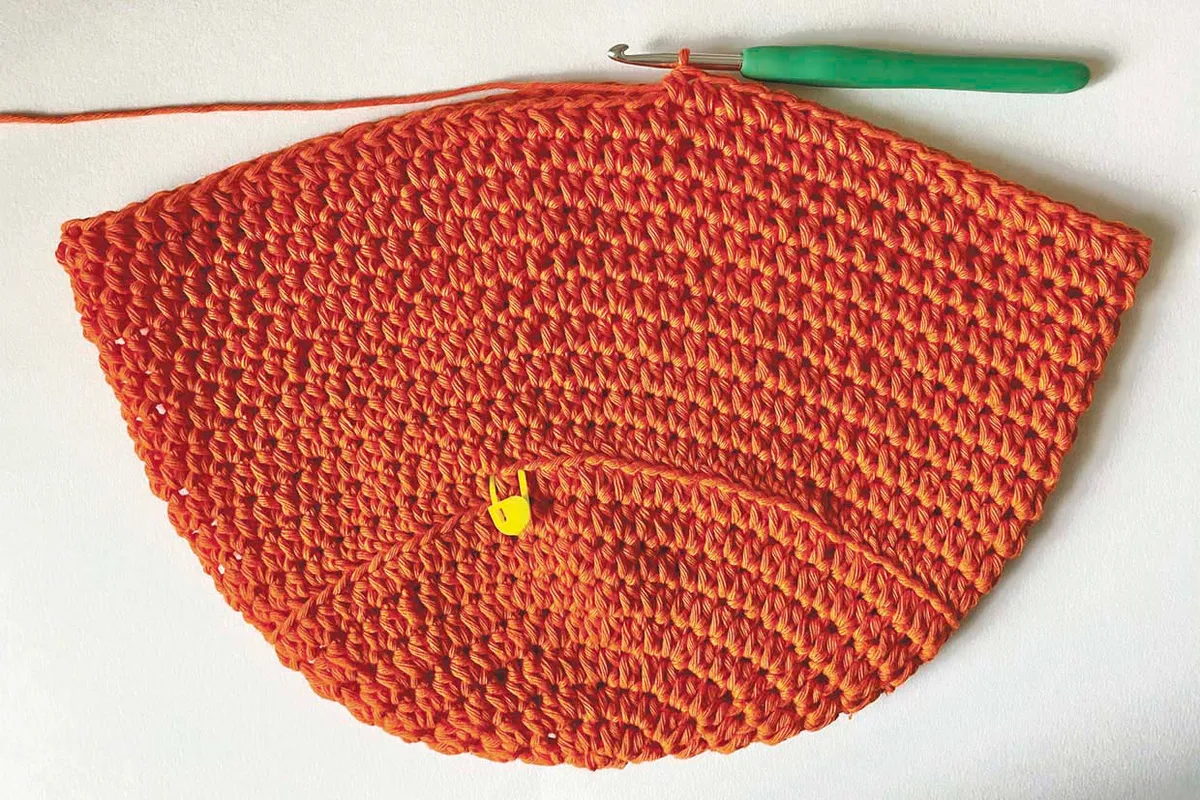
Finally, we’ll now make the brim of our hat.
Round 21 work this round through front loop only (FLO), *1htr in next st, 2htr in next st; repeat from * to end of round. [120 sts]
Rounds 22-24 1htr in each st around.
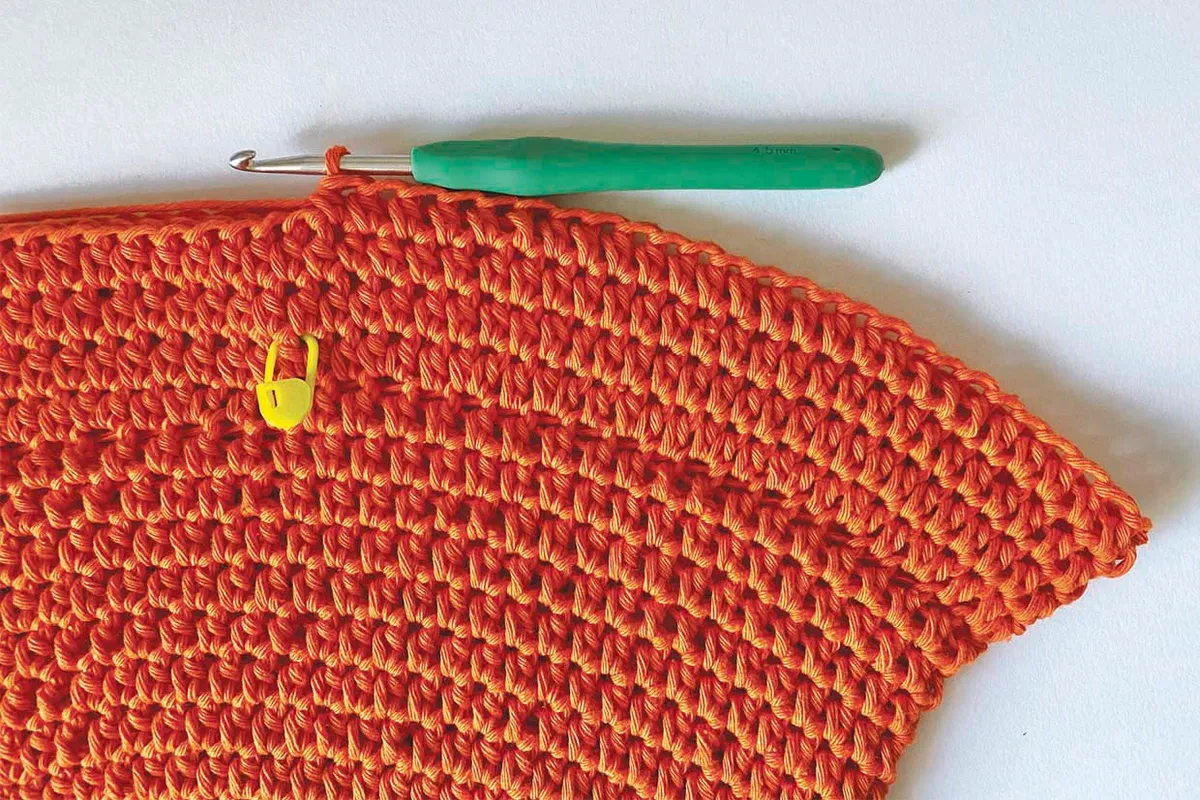
At the end of Round 24, work 1dc in the first 2 sts and a slip stitch (ss) in the next 2 sts.
Fasten off and weave in all ends.

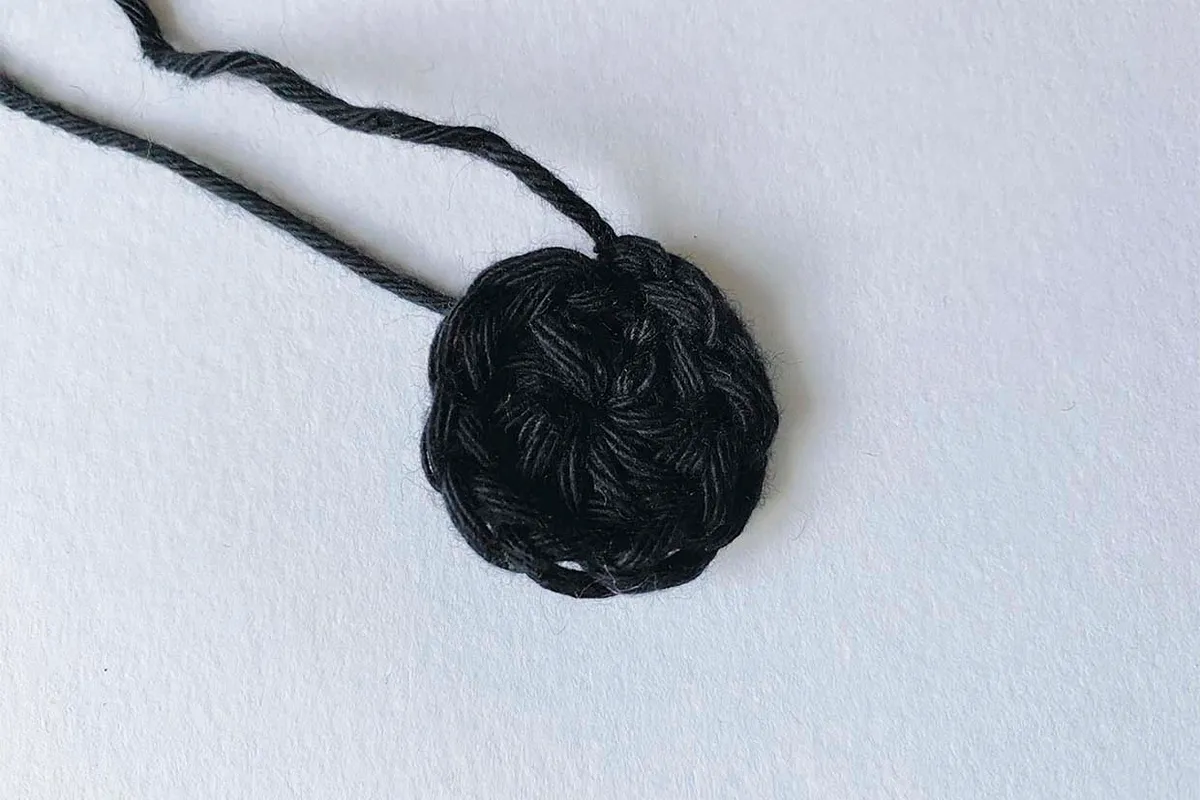
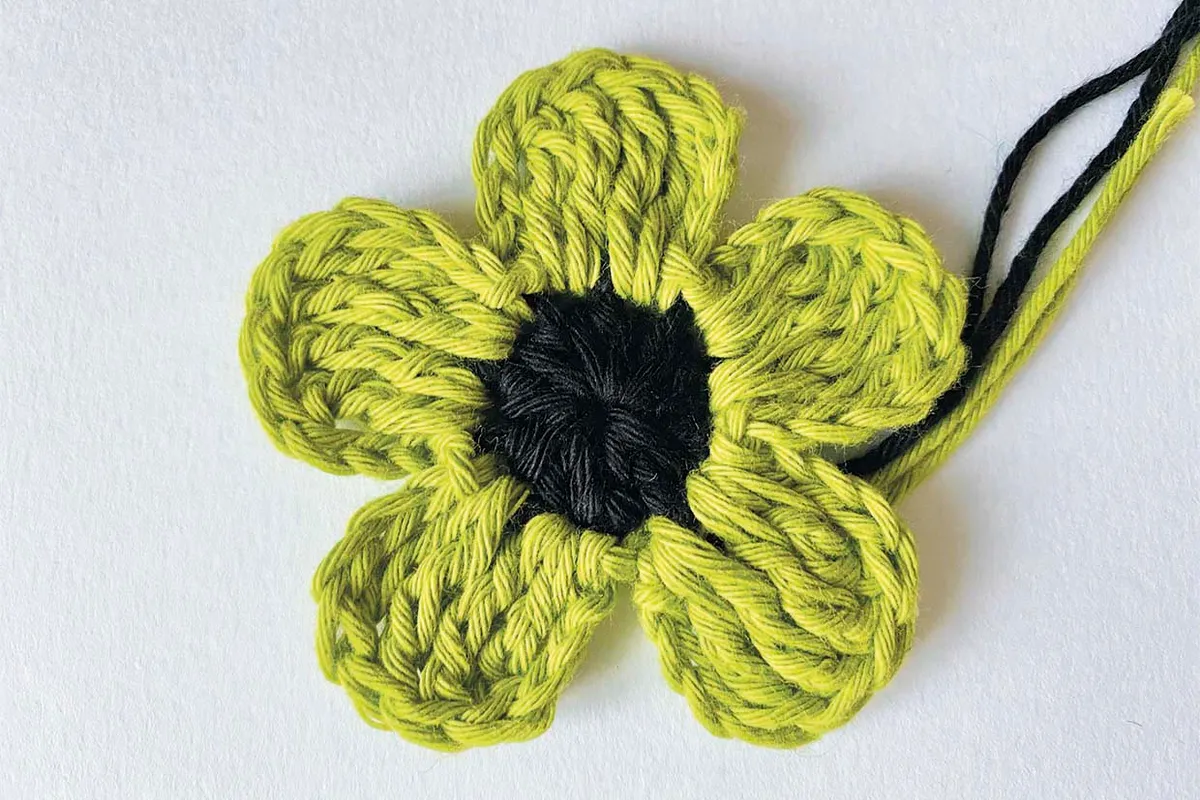
How to make the optional flowers
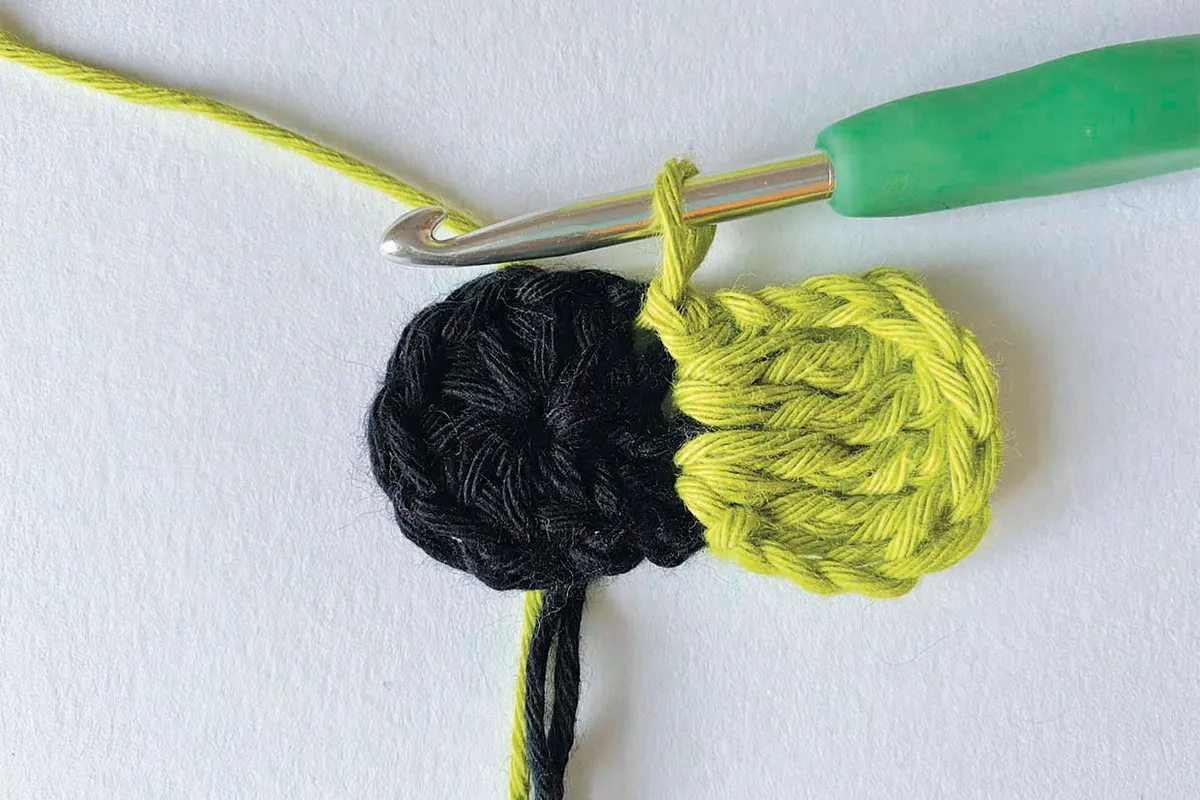
We’re going to make six flowers in total. All flowers start with Yarn B, then we’ll make two flowers each with round 2 made in either Yarn C, D or E.
Using Yarn B, start with a magic ring (or ch4 and join with a ss to form a ring).
Round 1 Ch2 (counts as 1htr), 9htr in ring, join to top of starting ch2 with a ss, pull ring tight to close. Fasten off. [10 sts]
Round 2 Join Yarn C, D or E in any st, ch3, 2 double treble crochet (dtr) in same st, (2dtr, ch3, ss) in next st, *(ss, ch3, 2dtr) in next st, (2dtr, ch3, ss) in next st; repeat from * to end of round, ending with a ss in first st. [30 sts]
Fasten off and weave in all ends. Pin the flowers onto the hat using the images as a guide to placement. Using clear thread and running stitch, sew around the outside of the petals to secure them in place.
Hook a hat for kids too
Fancy making a cool crochet hat for your little one too? You’ll find loads of choice in our roundup of the best baby and kids hat crochet patterns.
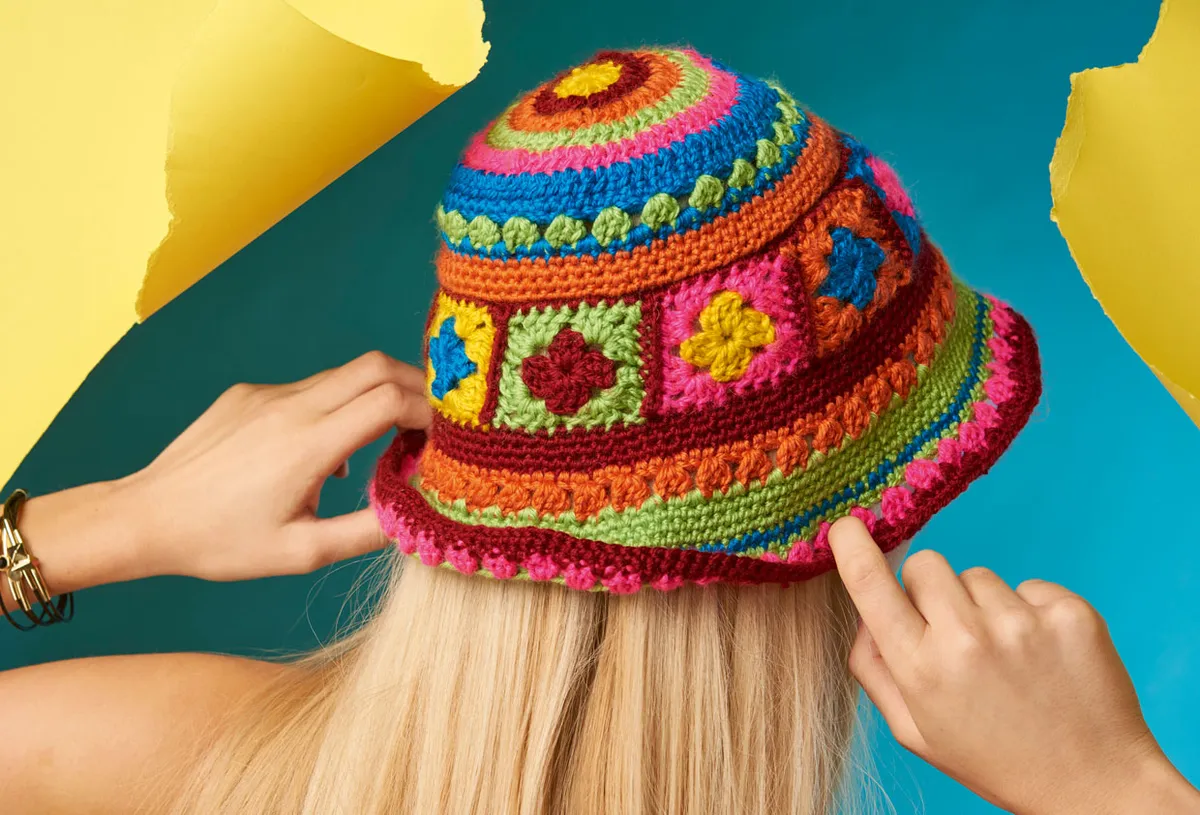
Congratulations, you now know how to crochet a bucket hat! For those of you who fancy something a bit more challenging, we’re treating you to another fab crochet bucket hat pattern featuring super-chic granny squares and a range of colours and stitches.
Free granny square bucket hat crochet pattern

This characterful free crochet bucket hat pattern by Anne Egan uses classic crochet motifs and a range of stitches to create a unique and fun take on this on-trend accessory. It’s a simple bucket hat shape, but the granny squares and clashing brights keep things playful.
Materials needed for this granny square hat
Any Aran weight yarn (we’d suggest Rico Design Creative Cotton Aran for a cool cotton hat or Stylecraft Special Aran Acrylic yarn) for a warmer winter make. You will need 1 ball of at least 190m each in the following colours:
- Yarn A - Neon Pink
- Yarn B - Yellow
- Yarn C - Lime Green
- Yarn D - Orange
- Yarn E - Blue
- Yarn F - Red
Please note: This crochet bucket hat pattern was first published in issue 56 of Simply Crochet magazine and was originally designed in Knit Picks Mighty Stitch (20% superwash wool, 80% acrylic, 100g/190m) yarn. We've substituted this so that you can make alternative yarn choices.
Important information about this granny square bucket hat pattern
This bucket hat is made by starting with a band of mini granny squares, then working the brim down from one side and joining the top of the hat to the other side.
The hat measures 22cm (8¾in) high and has a circumference at the ring of mini squares measuring 46cm (18in).
You can find a full list of all abbreviations we use in our abbreviations and conversions guide. This free crochet bucket hat pattern is written in UK terminology but you can easily convert it to US terms using the guide.
Free crochet granny square bucket hat pattern
Start by making your mini Granny Square motifs
Make 9 squares with shades as follows:
- Yarn D and Yarn F
- Yarn C and Yarn E
- Yarn A and Yarn D
- Yarn E and Yarn B
- Yarn F and Yarn C
- Yarn B and Yarn A
- Yarn E and Yarn D
- Yarn A and Yarn E
- Yarn C and Yarn B.
Chain (ch) 4, ss to first ch to join into a ring.
Round 1 Ch3 (counts as a treble crochet stitch (tr)), 2tr in ring, (ch2, 3tr) 3 times, ch2, slip stitch (ss) into top of beginning (beg) ch-3 to join. Fasten off.
Round 2 Join new colour in ch-2 space (sp), ch3, (2tr, ch2, 3tr) in same ch-2 sp, (3tr, ch2, 3tr) in each remaining ch-2 sp, ss in top of beg ch-3 to join. Fasten off and weave in ends.
Join the squares together into a band, holding wrong sides together and using Yarn F, work a dc seam between each square.
Next make the bucket hat brim
Join Yarn F to any stitch on the lower edge of the granny square band.
Round 1 Ch1 (does not count as st throughout), double crochet (dc) evenly around, working a dc into each tr, each ch-2 sp and each seam, ss to first dc to join. [81 dc]
Round 2 Ch1, (dc in next 8 sts, 2dc in next st) 9 times, ss to first dc. [90 dc]
Round 3 Ch1, (dc in next 8 sts, 2dc in next st) 10 times, ss to first dc. [100 dc]
Round 4 Ch1, (dc in next 9 sts, 2dc in next st) 10 times, ss to first dc. Fasten off. [110 dc]
Round 5 Join Yarn D in first st, ch1, (dc in next 10 sts, 2dc in next st) 10 times, ss to first dc. [120 dc]
Round 6 Ch3, 2tr in base of ch-3, skip 2 dc, *3tr in next stitch (st), skip 2 dc; repeat from * around, ss in top of beg ch-3 to join. Fasten off. [120 tr]
Round 7 Join Yarn C between any two 3-tr groups, ch1, *2dc between 3-tr groups, skip next tr, dc in next tr, skip next tr; repeat from * around, ss to first dc to join.
Round 8 Ch1, (dc in next 11 sts, 2dc in next st) 10 times, ss to first dc to join. [130 dc]
Round 9 Ch1, dc in each st around, ss to first dc.
Round 10 Ch1, (dc in next 12 sts, 2dc in next st) 10 times, ss to first dc to join. Fasten off. [140 dc]
Round 11 Join Yarn E in first st, ch1, dc in each st around, ss to first dc to join. Fasten off.
Change to Yarn C.
Round 12 Join Yarn C in first st, ch1, (dc in next 13 sts, 2dc in next st) 10 times, ss to first dc to join. Fasten off. [150 dc]
Round 13 Join Yarn A in first st, ch3, 2tr in base of ch-3, skip 2 dc, *3tr in next st, skip 2 dc; repeat from * around, ss in top of beg ch-3 to join. Fasten off.
Round 14 Join Yarn F between any two 3-tr groups, ch1, *(2dc between 3-tr groups, skip next tr, dc in next tr, skip next tr) 4 times, 2dc between 3-tr groups, skip next tr, 2dc in next tr, skip next tr; repeat from * around, ss to first dc to join. [160 dc]
Fasten off and weave in ends.

Making the top of the hat
Using Yarn B, make a crochet magic loop.
Round 1 Ch3 (counts as tr throughout), 11tr into ring, ss to top of beg ch-3 to join. Fasten off. [12 tr]
Round 2 Join Yarn F in first st, ch3, tr in st at base of ch-3, 2tr in each tr around, ss in top of beg ch-3 to join. Fasten off. [24 tr]
Round 3 Join Yarn D in first st, ch3, 2tr in next tr, *tr in next tr, 2tr in next tr; repeat from * around, ss in top of beg ch-3 to join. Fasten off. [36 tr]
Round 4 Join Yarn C in first st, ch3, tr in next tr, 2tr in next tr, *tr in each of next 2 tr, 2tr in next tr; repeat from * around, ss in top of beg ch-3 to join. Fasten off. [48 tr]
Round 5 Join Yarn A in first st, ch3, tr in each of next 2 tr, 2tr in next tr, *tr in each of next 3 tr, 2tr in next tr; repeat from * around, ss in top of beg ch-3 to join. Fasten off. [60 tr]
Round 6 Join Yarn E in first st, ch3, tr in each of next 3 tr, 2tr in next tr, *tr in each of next 4 tr, 2tr in next tr; repeat from * around, ss in top of beg ch-3 to join. [72 tr]
Round 7 Ch1, dc in each tr around, ss to first dc to join. Fasten off.
Round 8 Join Yarn C in first st, ch3, 2tr in st at base of ch-3, skip 2 dc, *3tr in next st, skip 2 dc; repeat from * around, ss in top of beg ch-3 to join. Fasten off.
Round 9 Join Yarn E between any two 3-tr groups, ch1, *2dc between 3-tr groups, skip next tr, dc in next tr, skip next tr; repeat from * around, ss to first dc to join. Fasten off. [72 tr]
Round 10 Join Yarn D in first st, ch1, dc in each dc around, ss to first dc to join. [72 dc]
Round 11 Ch1, (dc in next 17 sts, 2dc in next st) 4 times, ss to first dc to join. [76 dc]
Round 12 Ch1, (dc in next 18 sts, 2dc in next st) 4 times, ss to first dc to join. [80 dc]
Round 13 Ch1, 2dc in first st, dc in each st around, ss to first dc to join. [81 dc]
Fasten off and weave in ends.
Finally, we need to join it all together
Join Yarn F to top of mini granny square Band. Repeat Round 1 of the brim. Do not fasten off. With Right Side (RS) held together, join the top of hat to bottom using a ss seam. Fasten off and weave in all ends.
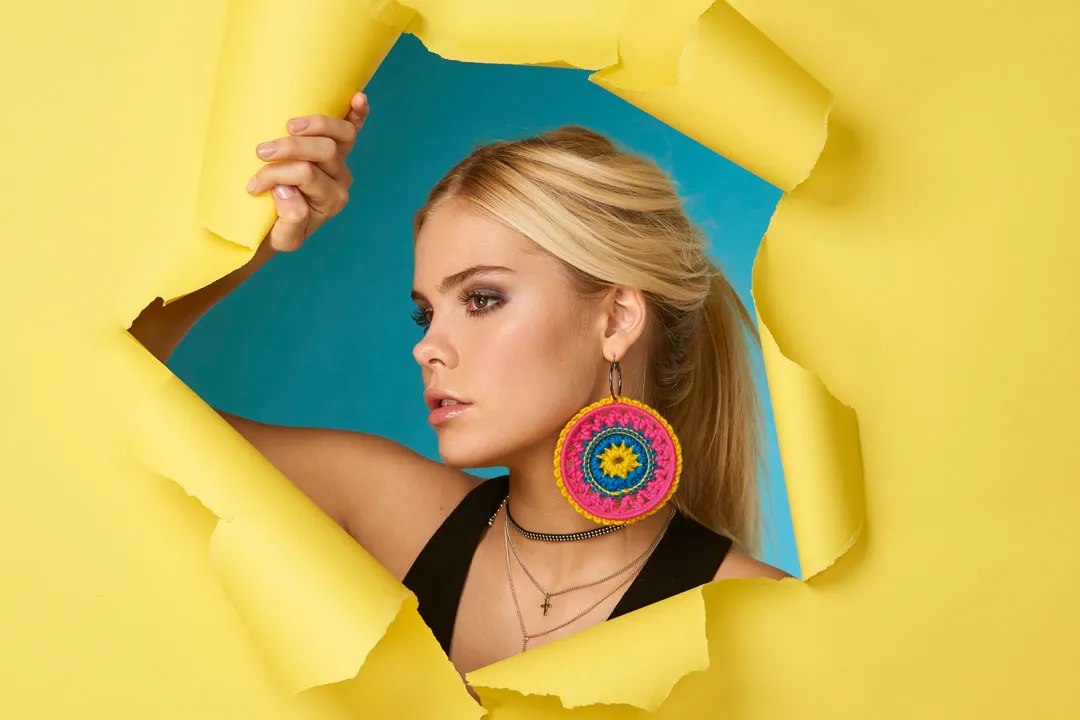
Matchy-matchy
Fancy accessorising your fancy granny bucket hat? Then don't miss this free crochet earrrings pattern from the same design collection.
How will you style your crochet bucket hat?
We love the unique style of both of these crochet bucket hat patterns, however we also love customising too! Switch up the colours to match your outfits, or try adding different applique motifs or embroidered details on to add your own style.
Make a hat for every occasion
Bucket hats may be on-trend right now, but there’s so many more crochet hats you can make. Check out the huge range of crochet hat patterns available with Gathered.