Stamping has always been very popular with card makers and it’s easy to see why. Stamping isn’t just a neat way to add greetings, it’s very versatile, too, with thousands of stamps out there to choose from.
Stamping supplies are inexpensive, and the results are quick. Use stamps to whip up your own patterned backgrounds for your cards, add characters and pictures to card fronts, or if you’re feeling adventurous, why not give heat embossing a go?
If you’re unsure about stamping or perhaps want to batch make a lot of toppers or motifs, you might like to try using a stamping platform, and we’ve rounded up the best stamping platforms available to buy today.
If you’re feeling inspired to try out more arts and crafts, why grab a cuppa and pour over some of our other in-depth guides, like learning how to do batik art, browse the best weaving techniques, or how about learning how to make your own hand-made paper?
If you’re in a crafty mood, check out our round-up of the best glue guns and best die-cutting machines. Thinking about buying a craft printer? Here’s our round-up of the best printers for card making.
We love seeing what you make, so don’t forget to share your craft projects with us on Instagram, Facebook, or Twitter, too!
Contents:
- What is rubber stamping?
- Glossary of stamp varieties
- Top tips
- Rubber stamping supplies
- Where to buy rubber stamps
- How to mount unmounted stamps
- How to care for your stamps
- How to store rubber stamps
- How to use clear stamps
- How to use a stamping platform
- Stamping with found objects
- What to do with rubber stamps: techniques, projects and ideas
What is rubber stamping?
Rubber stamping is a way of using rubber stamps with inks or dyes to transfer the image to another surface. Stamping is an ideal way to create patterns quickly over large areas, as the stamps can be re-inked and re-used many times. You can stamp onto a variety of materials, but the most popular are paper, card and fabric.
Stamps for crafting come in several main types:
- Cling stamps: Use with an acrylic block. They are either transparent and made from photopolymer or acrylic, or non-transparent and made from rubber, typically red, white or grey.
- Wood mounted stamps: These come pre-mounted on a wooden block.
- Grey stamps: Detailed stamps that come in sheets which you cut up yourself.
You can also use found items, or make your own from a variety of materials, and we’ll talk you through the most popular methods below.
Glossary of stamp varieties
Know the lingo with our handy guide to all the different types of stamp varieties:
Alphabet: Alphabet stamps are perfect for creating your own sentiments and stamped messages. They come in a number of different fonts, sizes and styles.
Background: These stamps will create fab backgrounds on the plainest of papers.
Character: Characters can be anything from sweet mice to elegant ladies. These add personality and come in a wide range – to suit all occasions and recipients.
Digital stamps: Also known as digi stamps, these are downloadable files to print and colour. No ink or stamping required. They are great for more detailed images, especially if you’re mass producing card designs.
Flourish: Usually a light and romantic linear design, a flourish can be anything from a swirl to a border with hearts or florals to add elegance to a sentiment or design.
Layered: A single image comes in a number of stamps, with each stamp, or layer, adding more detail to the image. Layers can also add shading or new elements, such as different flowers in a bouquet.
Personalised: Perfect for special occasions such as weddings and party invitations, you can create a stamp with your initials or specific details. These can be designed by yourself or speciality companies.
Sentiment: Whether wishing someone a happy birthday or saying ‘hello’, the message is as important as the overall design. It’s a good idea to have a library of sentiments for occasions throughout the year.
Silhouette: From landscapes to animals, these solid shapes can be great for beginner stampers or those looking to maximise the effects of heat embossing.
Texture: Create a background, or use for stamp kissing – texture stamps are so versatile. Usually larger stamps, these often cover A5 areas and come as bricks, bubbles, or hessian, to name a few.
Top tips for rubber stamping
- Apply the ink evenly over the stamp, making sure all parts are covered before stamping.
- Apply firm, even pressure onto the stamp to get an even print.
- Use a stamping platform to help get an even print every time.
- Different inks can stamp onto different surfaces. For basic stamping, dye-based inks like Archival will give a sharp image on both matt and gloss papers. If you’re working with a glossier material such as acetate, use StazOn, which won’t smudge once it is dried. Inks like VersaMark are used for heat embossing and Distress Inks are ideal for vintage-style, or manipulating with water.
- Create multicoloured prints by applying different colour inks to your rubber stamp. Do this by applying the inkpad directly to the stamp, or by using cotton buds to transfer the ink from the pad to the stamp.
- If you’re creating a repeat image using a tessellating stamp over a large area, lightly mark out a grid first in pencil to ensure precise positioning.
- Use a damp cloth to clean your stamp after each use. Scroll down for more tips on how to care for your stamps.
- For a darker stamped image, place the paper on a sheet of foam before stamping onto the paper. This will let the stamp sink in slightly for better coverage. Lay the stamp face up and dab with the ink pad until you have good coverage.
- It sometimes helps to stamp the image onto scrap card first and then re-ink and stamp the image in its final place.
- Always replace the lids on your ink pads when you’ve finished using them to prevent them drying out.
- Transfer inks onto an acrylic block and blend them together to create your own unique shades.
- You can also extend the life of your ink pads with an ink refresher. This spray rehydrates and conditions dye and pigment water-based ink pads without the need for re-inking.
Rubber stamping supplies: what do you need to start rubber stamping?
Rubber stamping is a simple craft to get into. You only need a few supplies (stamps, ink and paper) to get started, but if you’re after a comprehensive list of rubber stamping supplies to kit out your craft room to the max – read on!
Clear cling stamps
Clear stamps are very popular, and are often cheaper to pick up than the traditional red rubber stamps. There are two main types, photopolymer and acrylic, both of which are see-through. Being transparent means you can see exactly where you are positioning your stamp. Photopolymers are generally higher quality than acrylic stamps, and produce beautifully crisp images. You’ll need to use them with an acrylic block.
Red cling stamps
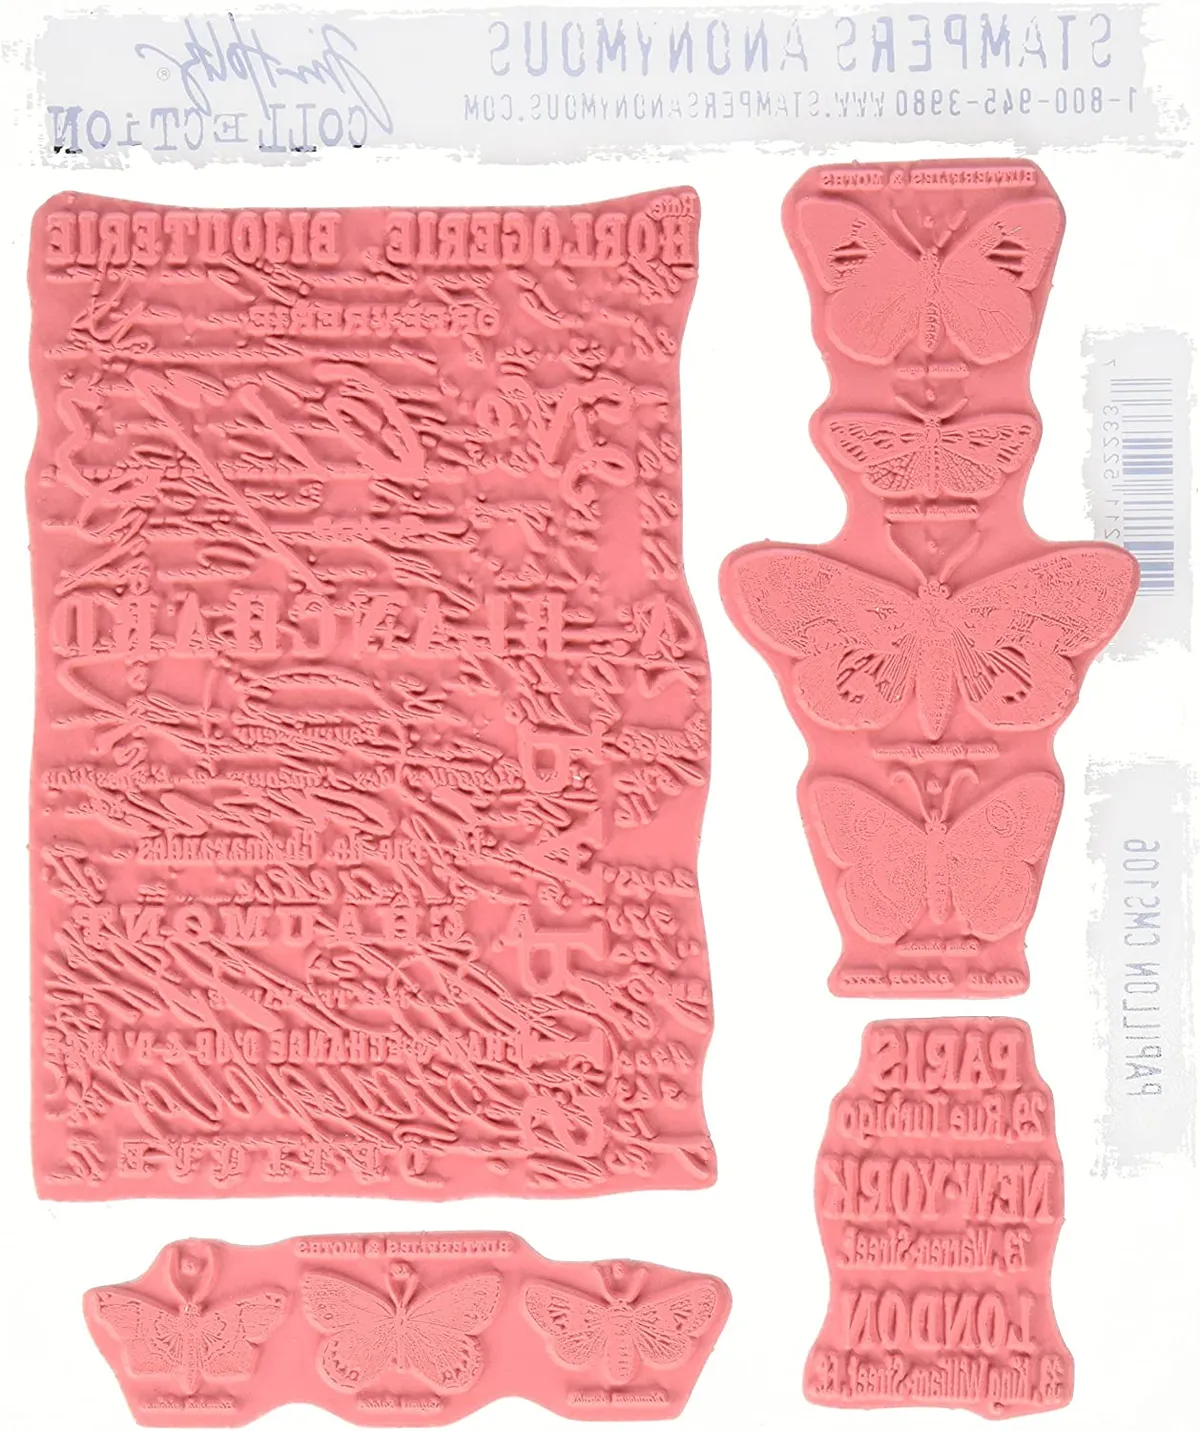
Red rubber stamps are often more durable than clear stamps, however, as they’re not transparent you can’t view the exact placement as you’re stamping. Like the clear cling stamps, you’ll also need an acrylic block to use red cling stamps. If you like the vintage look, you might like to have a look at the Tim Holtz range of red cling stamps, we love this Papillon stamp set!
Acrylic blocks
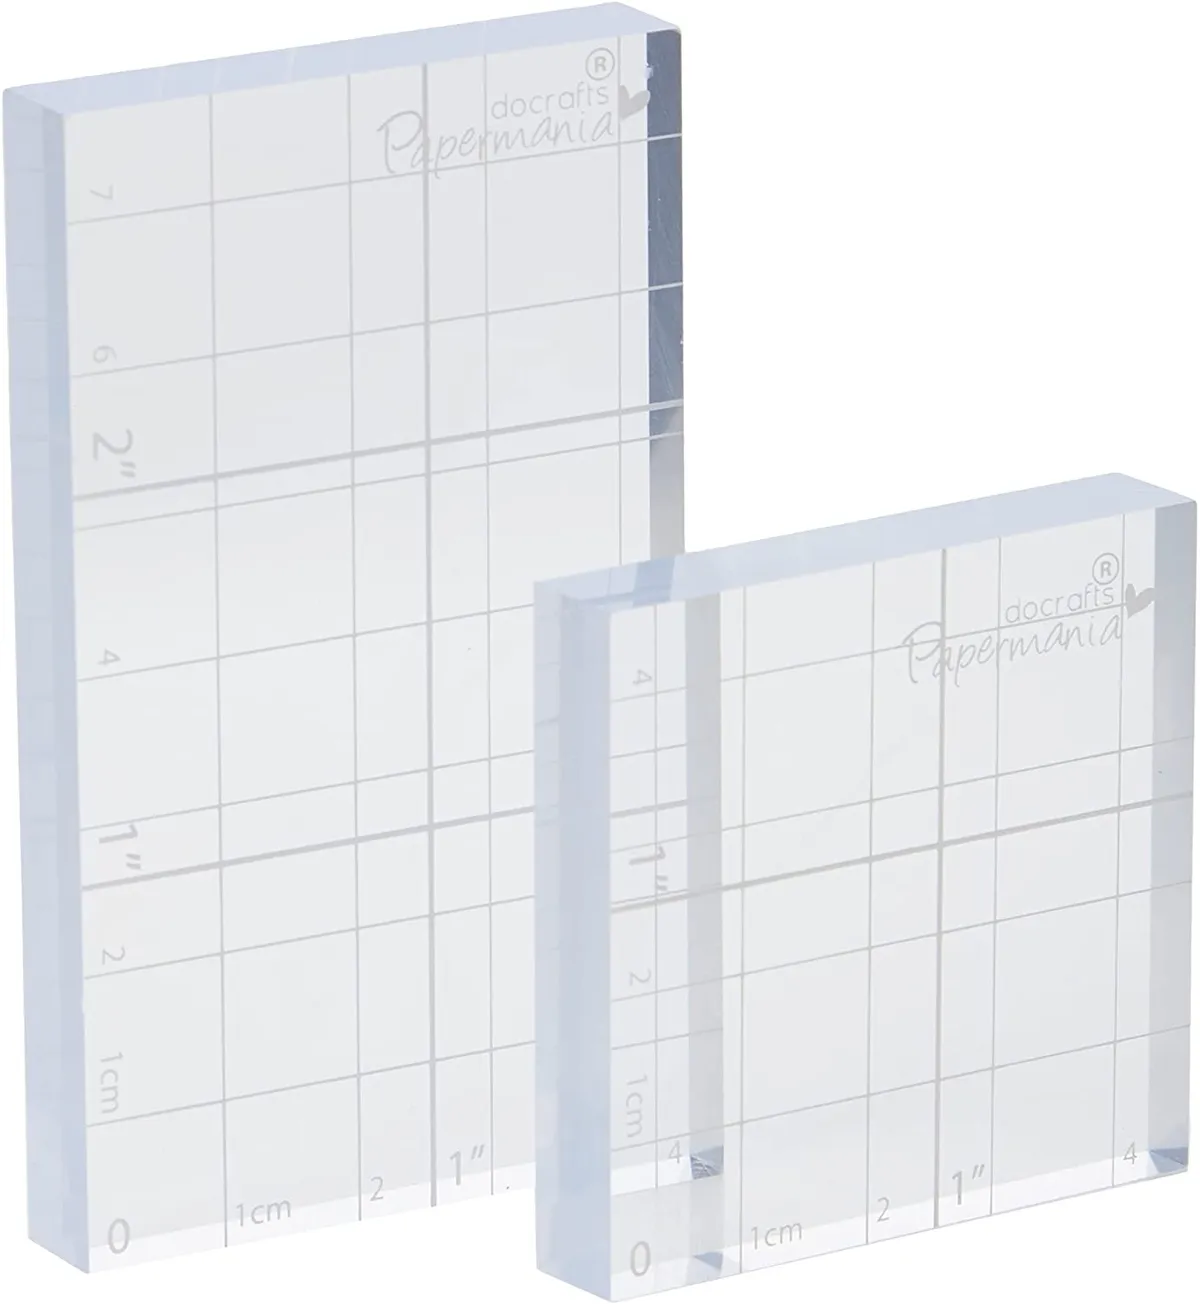
These come in various sizes and are used with unmounted clear stamps. Remove the stamp from its backing, and then attach it to the acrylic block – the tacky surface of the clear stamp means it will cling on easily. Because it and the stamp are clear, you can easily see through to the surface you’re stamping on. Once complete, simply peel off your stamp and the block can be used again.
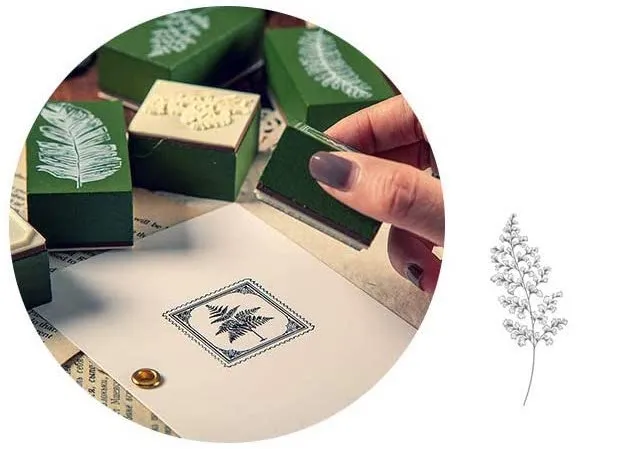
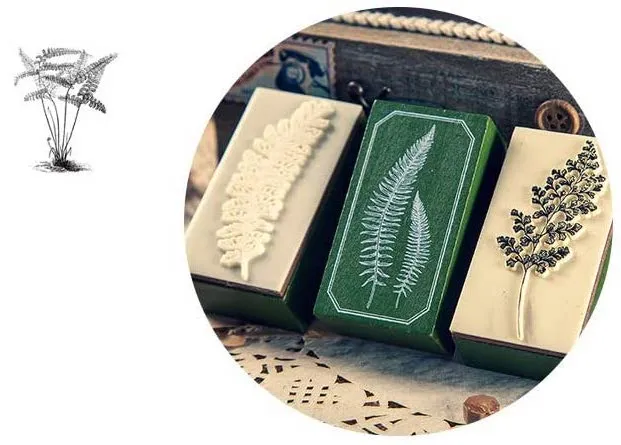
Wood-mounted stamps
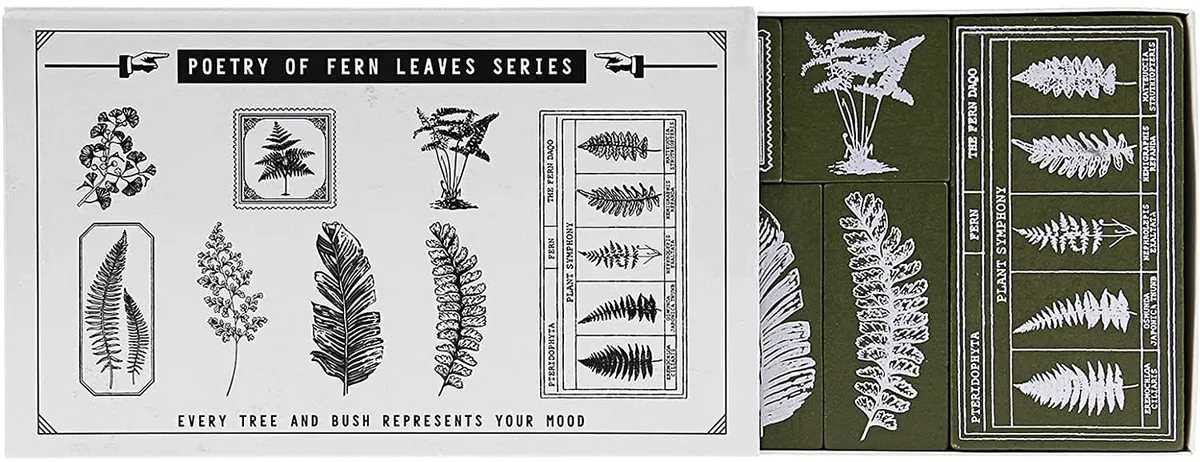
Wood mounted stamps are perhaps the easiest to use. They come ready to go, and you don’t need to use these with acrylic blocks. They are typically more expensive (although there are some brilliant deals to be had on Amazon, like these fern leaves), but will last for ages, so if you see a design you like, it’s worth snapping it up.
White stamping card
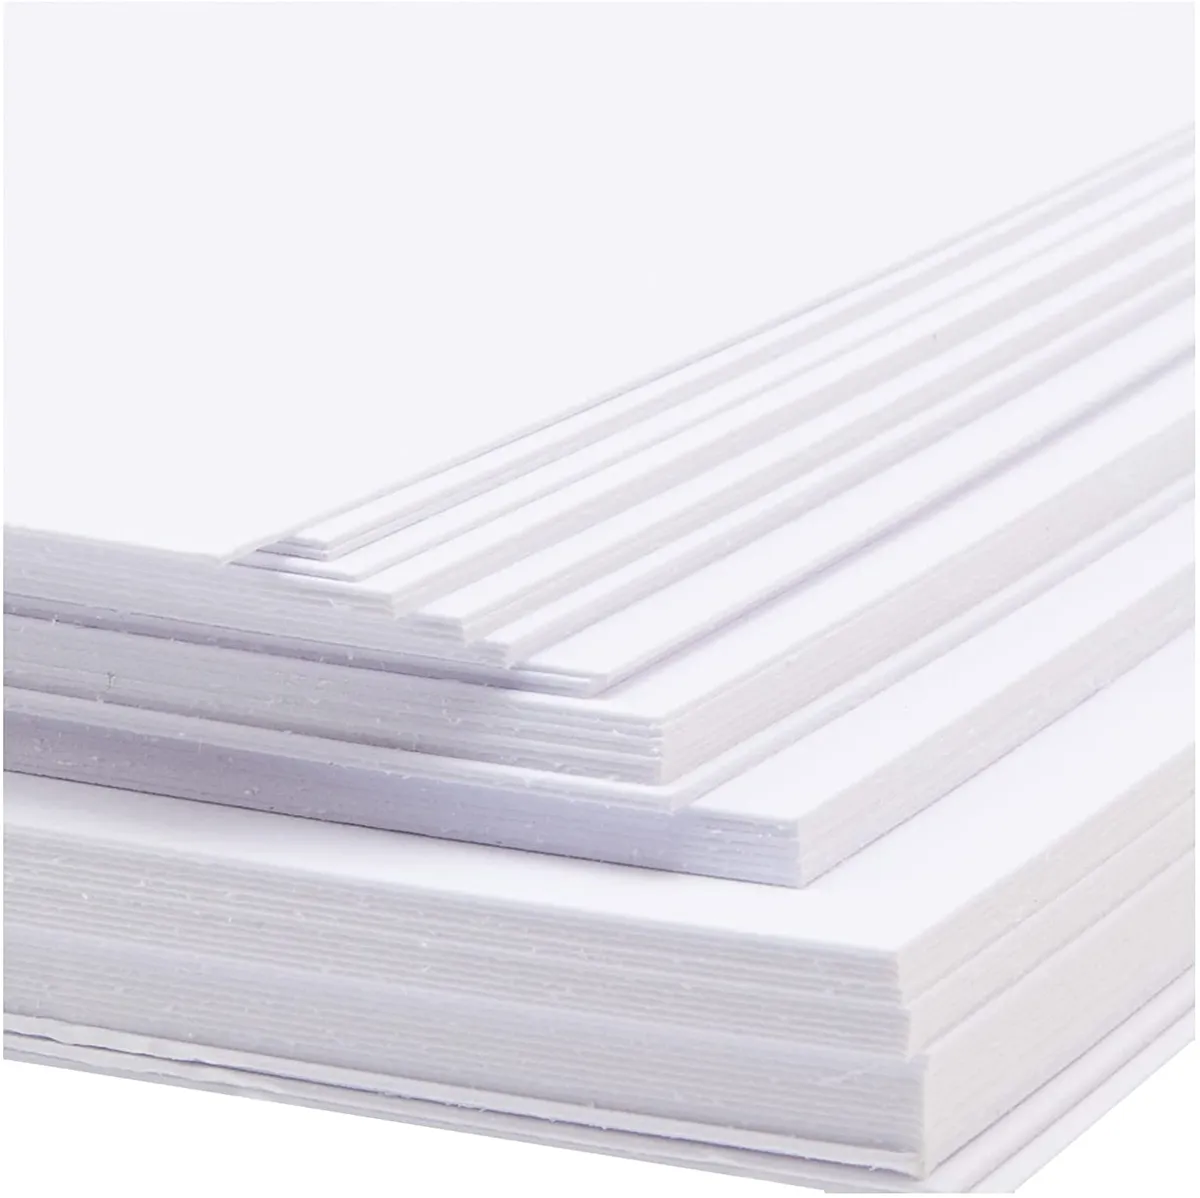
You can print on a variety of paper and cardstock, but if you’re starting out then it’s a good idea to begin with smooth white card, like this stamping card from Crafter’s Companion. It’s easy to stamp onto and easy to colour in afterwards.
Archival inks
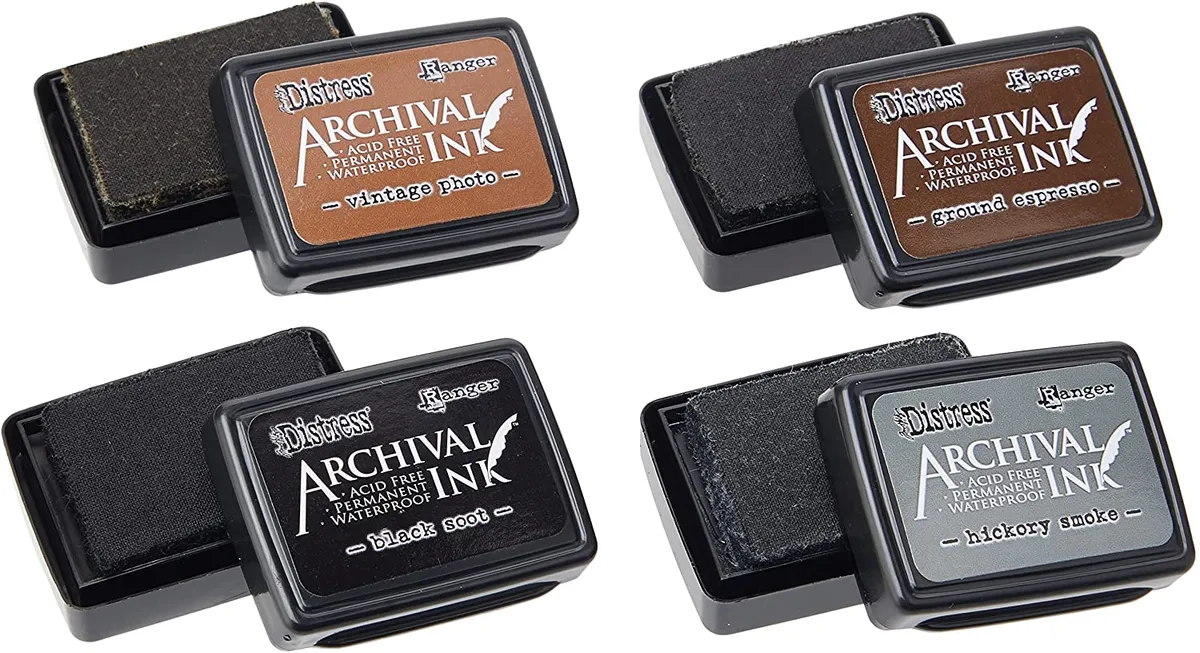
These waterproof dye-based inks are permanent on both matt and gloss papers. You’ll get a sharp stamped image that doesn’t bleed when it is coloured with water-based inks, markers or paints. The ink is fast drying but will need to be heat set on glossy surfaces to prevent smudging.
Distress Ink Pads
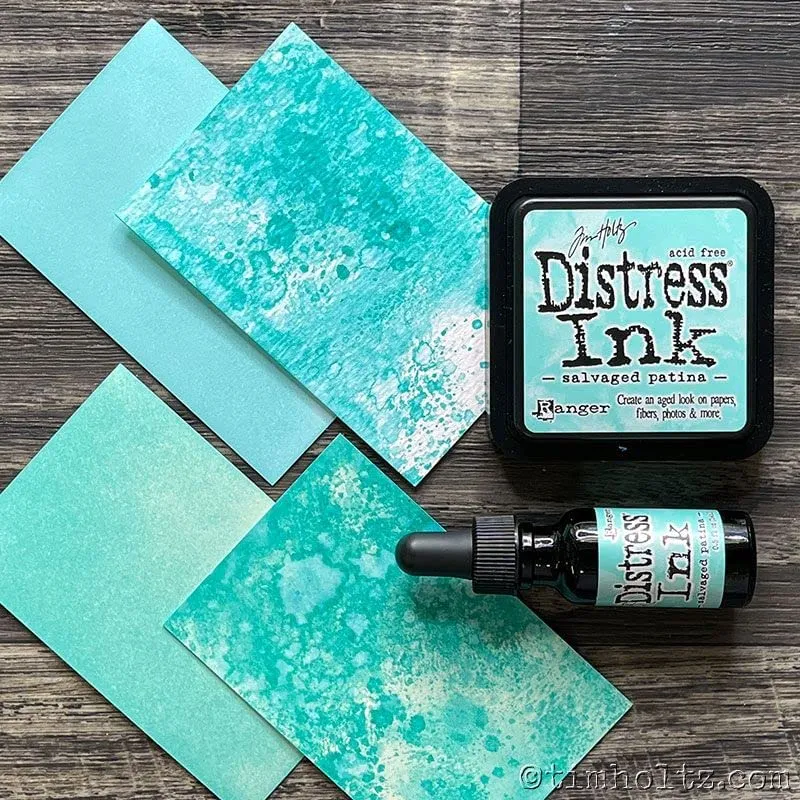
These water-based dye inks add a realistic weathered look to your stamped images. They are acid-free, slow drying and fade resistant, and can be easily blended with water. They are perfect for direct-to-paper techniques, and the standard-sized ink pads feature thicker felt to make this even easier. Distress inks are available individually or in mini-sets, and are a staple in many craft rooms.
StazOn Midi ink pads
The perfect way to build up your colour collection of ink pads is to buy mini or midi versions and, for this, I recommend StazOn Midi ink pads. Like the original StazOn ink pads, only smaller, StazOn Midi ink pads are permanent solvent-based inks that can be used on most surfaces, both porous and non-porous.
These midi ink pads are versatile as well as purse-friendly and are the perfect size for inking up small, intricate images and sentiments. Since they take up less storage space, you can easily pop a few into your crafting bag and take them to craft meet-ups.
Spectrum Noir inks
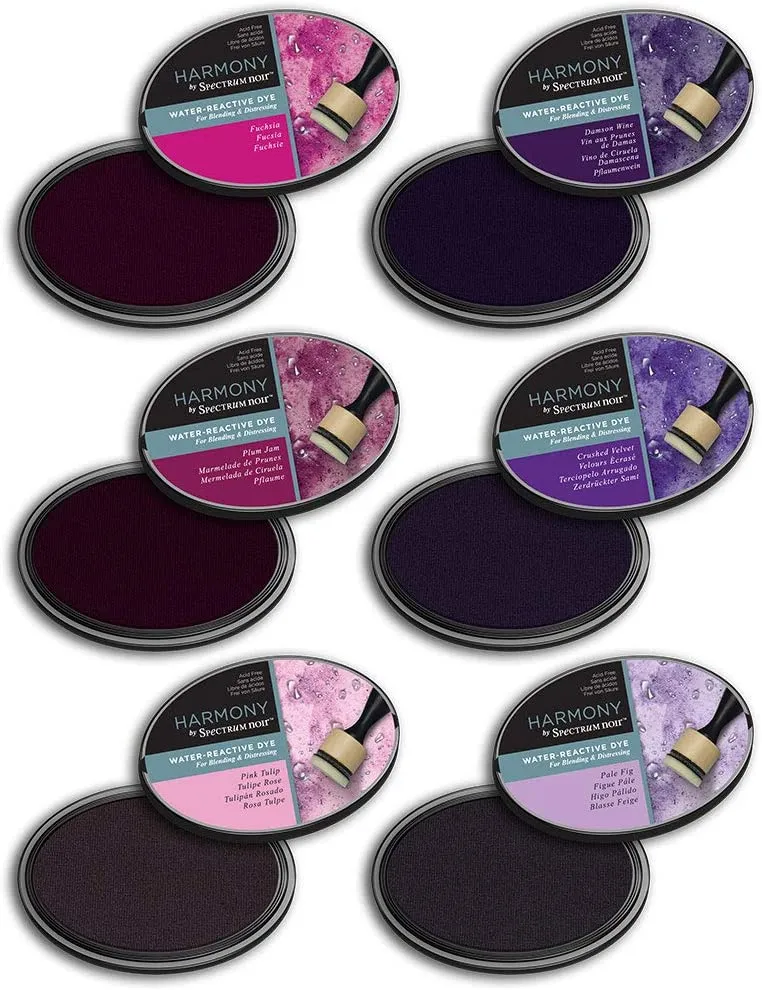
This collection of inks from Spectrum Noir is bursting with colour and includes an essential range of inks for use with watercolours and alcohol pens, as well as an exciting range of blendable inks. The special formula in the Harmony collection is slow-drying and reacts with water, for a wide variety of stunning layered and blended distress effects.
The Watermark ink pad will even create a wonderfully subtle watermarked impression on paper and card, perfect for creating background patterns and much more. The inkpads are available in bundles (as pictured here) or individually, so you can mix and match.
Carve your own stamps
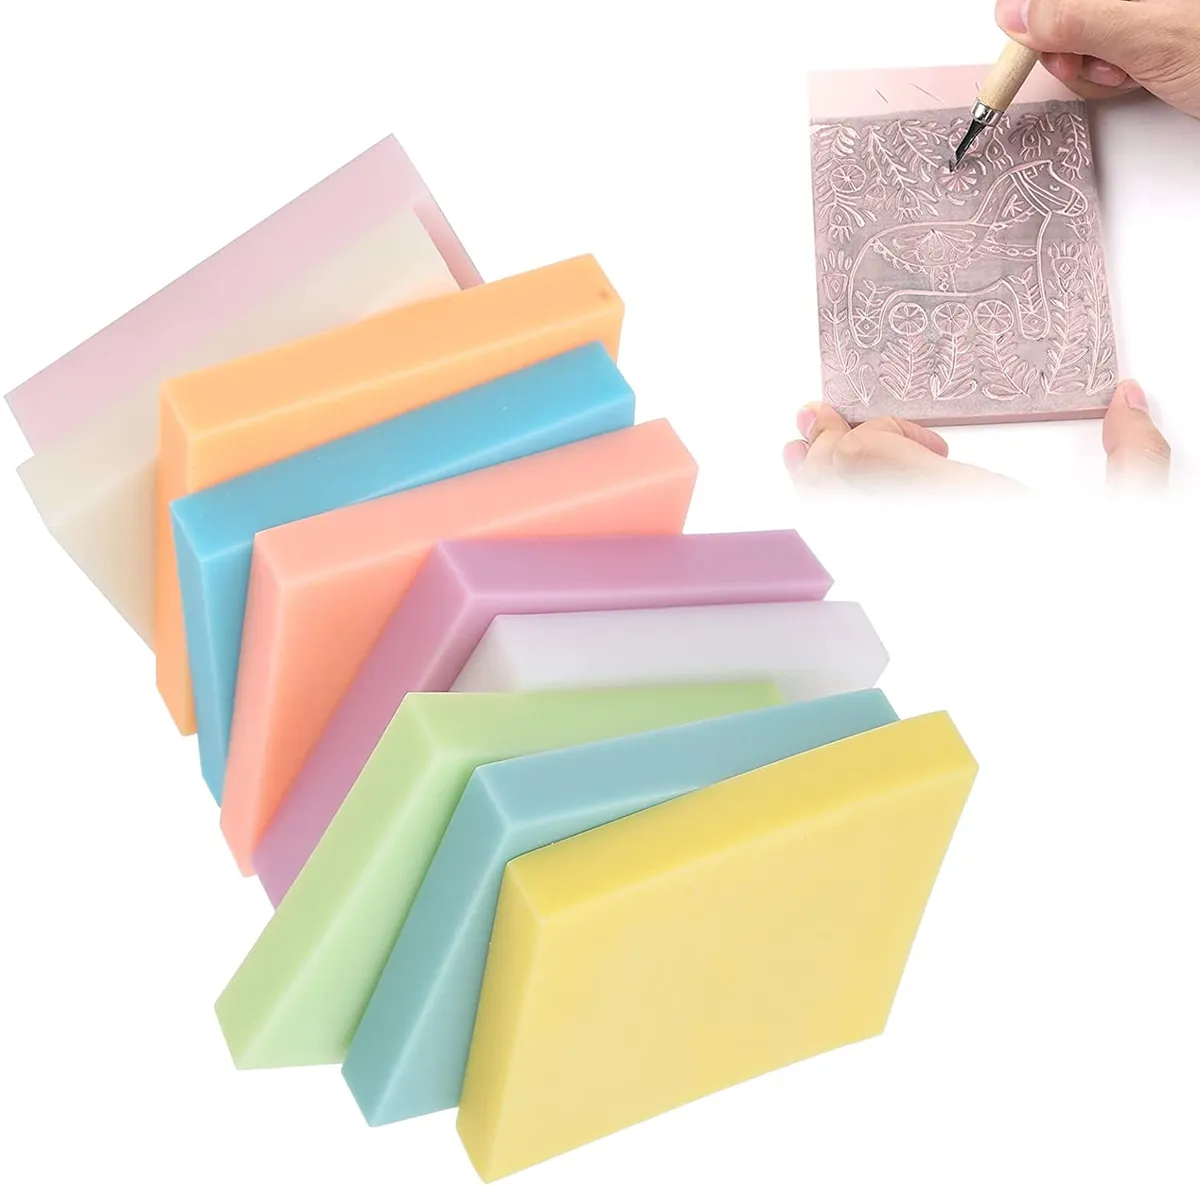
If you want to take rubber stamping a step further, how about carving your own stamps? You can use found materials or you can also buy PVC blocks like these, ready to carve.
Get Into Art magazine
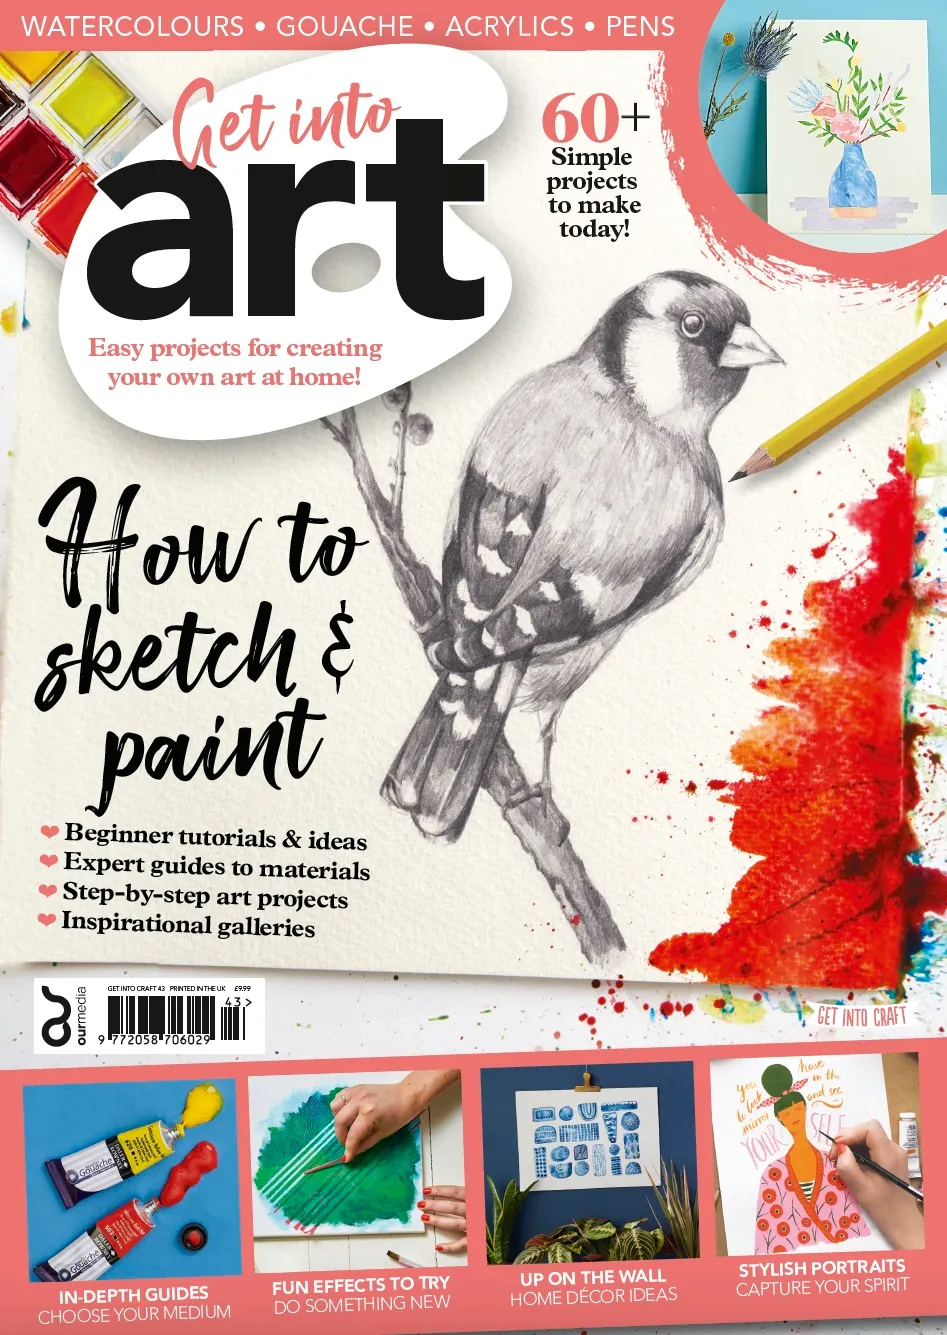
- Buy now from buysubscriptions.com (£9.99)
Okay, so this one is not strictly stamping, but we think you’ll love it! It’s our very own Get Into Art magazine, and it’s packed full of gorgeous projects, expert knowledge, advice and interviews with artists. There are over 60 inspirational projects to try, step-by-step tutorials, as well as guides to all the best art equipment.
Brayer
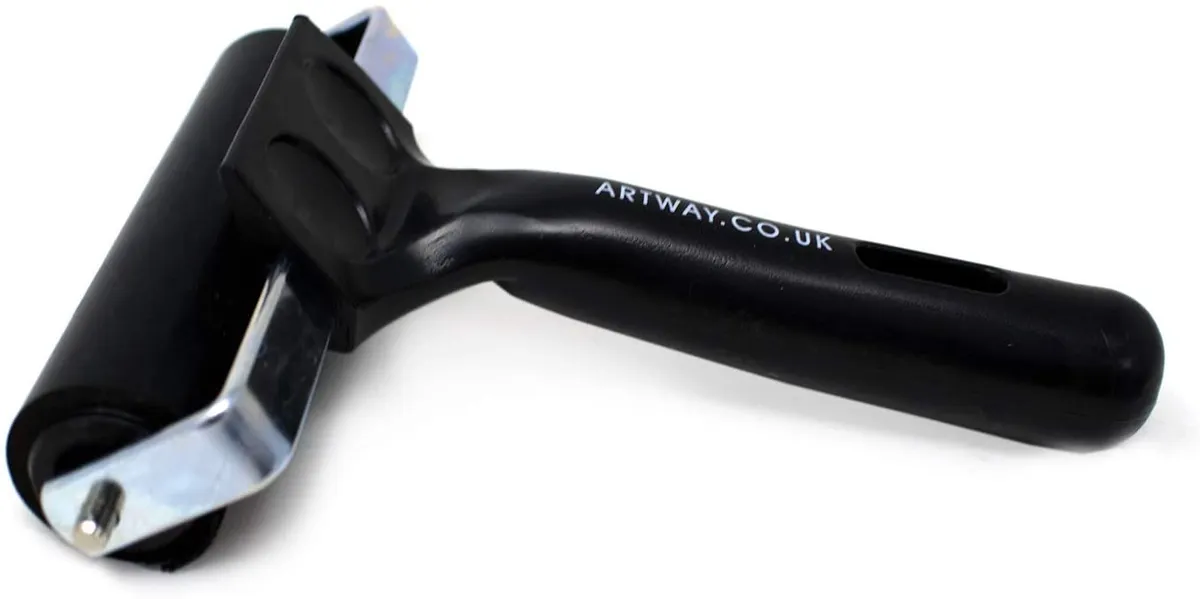
This is typically a hard rubber roller that can be used to apply ink to larger stamps or for creating an inked background on paper or card. Some brayers also have a decorative surface that creates a pattern when rolled. They come in a number of different widths and materials including foam and rubber, suitable for different effects.
Glass cutting mat

Glass cutting mats provide a nice, even surface to stamp onto, as well as a way to protect your surface from mess. Glass cutting mats are great, because they double as ink blending mats, so are perfect for crafting. They keep the ink wetter longer so you can experiment and play with different colour combinations and achieve seamless ink blending.
Plus, they’re solvent resistant, which means that they’re super easy to clean and your inks won’t stain them. The Tim Holtz Glass Media Mat has a useful white area so that you can see exactly the colours you're mixing.
Stamping mat
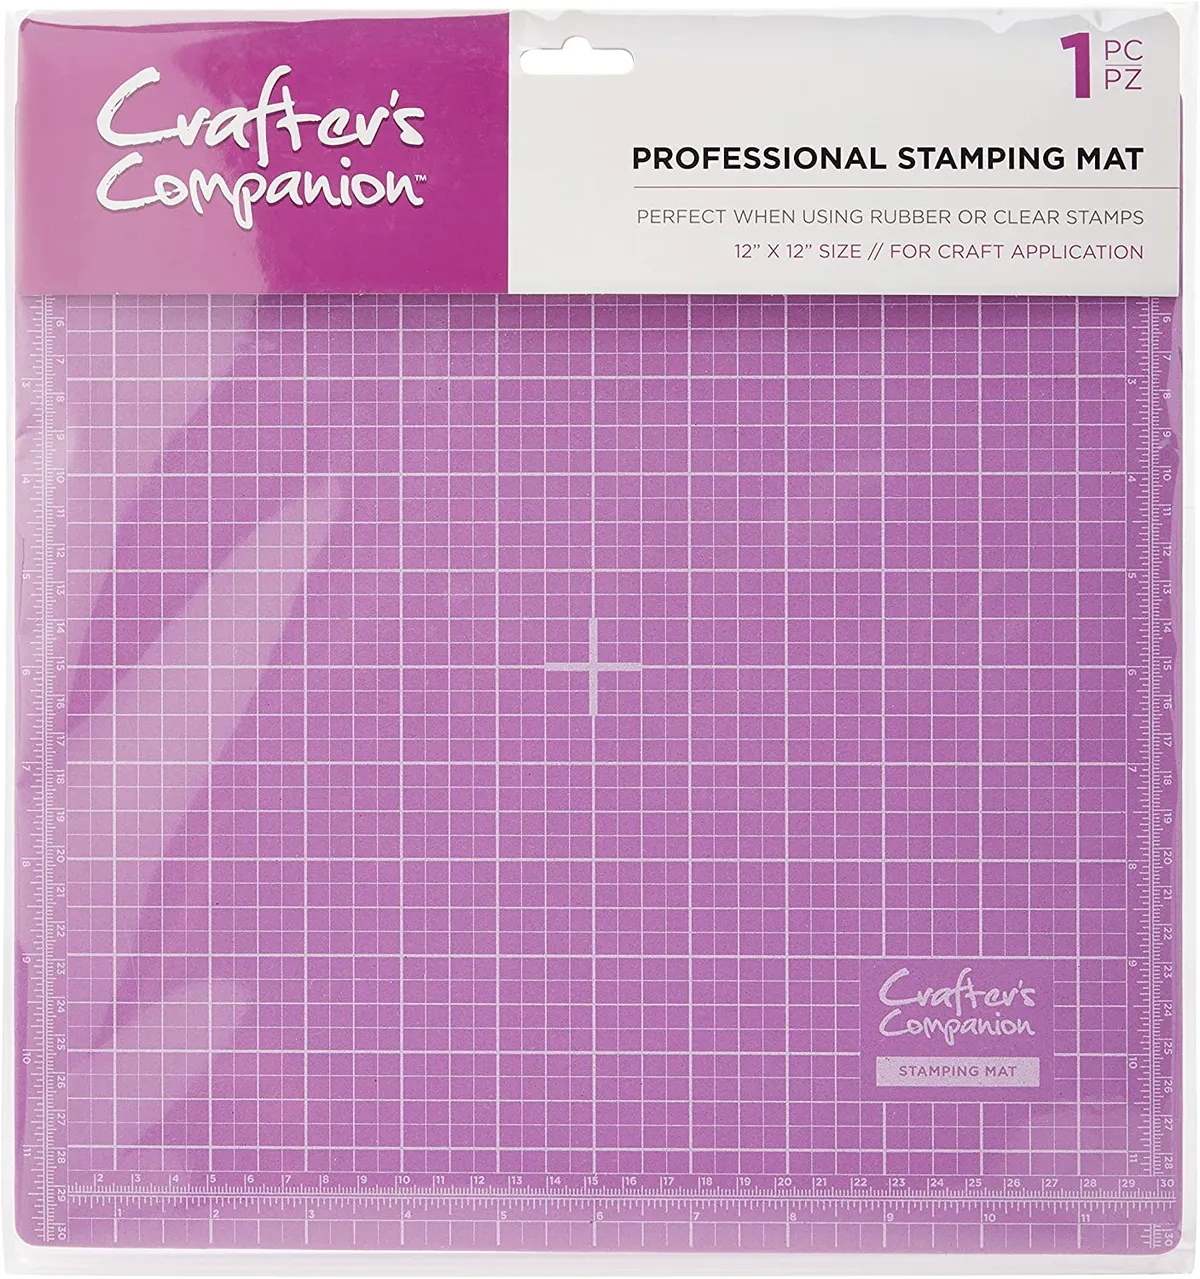
Usually made from foam or rubber, these mats have a grid to assist with stamping. The padded surface helps your inked image to make contact with the paper, which eliminates uneven stamping. This stamping mat from Crafter’s Companion is 12x12”, so it’s ideal for both card makers and scrapbookers, and won’t break the bank, either.
Stamping platform

This helps you to position your stamps accurately, especially if you’re stamping images over each other. The simplest version comes with a positioning sheet and an L-shaped acrylic block. You stamp your image onto the positioning sheet, nestle this against the tool to achieve the position you want and then use this position to stamp your image.
Other types include a stamp press version on four sponge feet and a hinged lid with a grid for aligning your stamps, like this one from Tonic Studios.
Waterbrush

This is a hollow paintbrush that you fill with water, which then allows you to easily blend watercolour crayons or pencils when colouring in. It’s less messy to use than a paintbrush dipped in water, easy to transport and lets you control the flow of water.
Ink blender tool
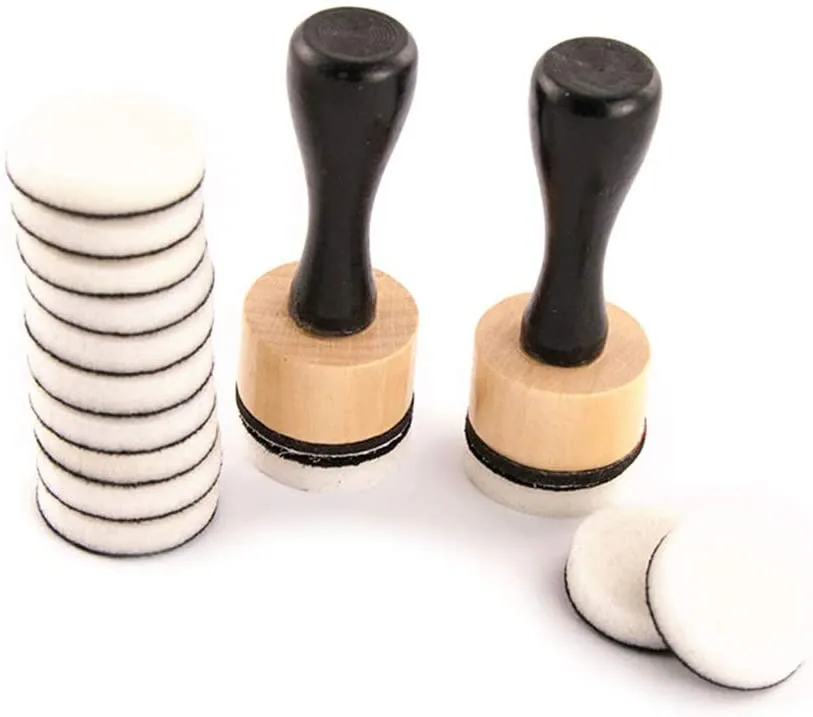
A versatile tool, the ink blender has a foam end that is perfect for applying inks and paints to stamps, cards, or other surfaces to achieve a smooth finish. It can also be used to blend or layer inks together.
You can buy extra foam pads to use with different colour palettes or even create your own ink blending tool with a kitchen sponge or makeup sponge and a binder clip as a handle.
Anti-static bag
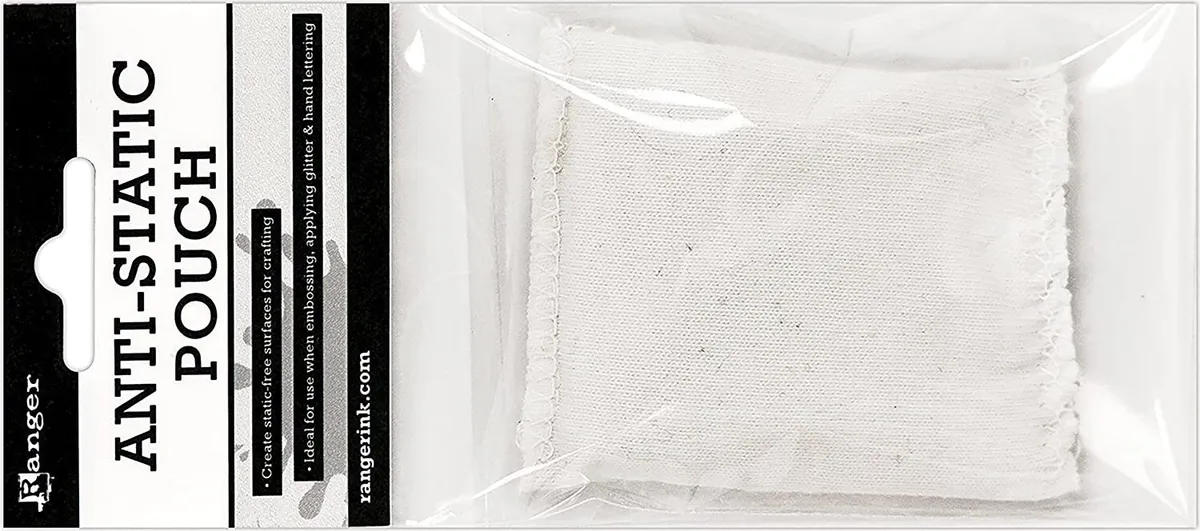
This is a small fabric bag which is filled with mineral powder. Simply rub this bag over your card or stamping surface when heat embossing to remove static and prevent any stray embossing powder from sticking to your surface. The bag is also useful when creating shaker cards to prevent the internal elements from sticking to the acetate.
Heat tool

For heat embossing: use your heat tool with clear pigment ink such as VersaMark ink and embossing powder for a glossy, raised effect on stamped images. A heat tool that has dual heat settings gives you more control, so we recommend the WOW! Dual Heat Tool.
Spray bottle

This is used to apply a fine mist of water to watercolour pencils or crayons when colouring in. You can also use a spray bottle to apply inks to a surface for interesting ink techniques such as ink smooshing – adding watered-down ink to your stamped image by transferring it with acetate.
We like these mini misters from Ranger, they’re small enough to keep in a pencil case but provide enough water for paper crafters to use with Distress Inks.
Stamp cleaner
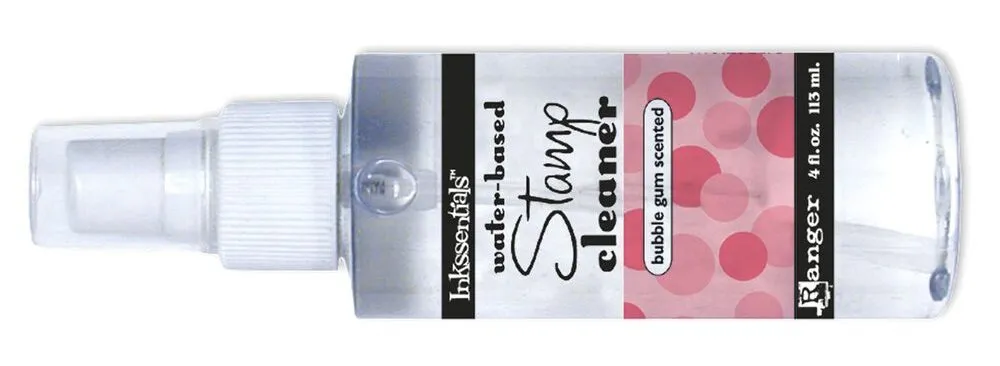
Use this after stamping to remove ink from your clear acrylic blocks and photopolymer stamps and to prolong their life. It either comes as a liquid that you apply with a cloth (pictured here), or in a moist pad that you rub the stamps against.
Where to buy rubber stamps
You can pick up rubber stamps in most arts and craft shops, and of course as cover gifts on magazines. These are some of the most popular rubber stamp suppliers:
- Amazon
- Hobbycraft
- The Range
- Crafter’s Companion
- Create & Craft
- Etsy
- Lawn Fawn
- Sizzix
- Stampin’ Up!
- English Stamp Company
- Stampers Anonymous
- The Works
How to mount stamps
Use a self-adhesive foam backing layer to turn an unmounted stamp from a rubber ‘plate’ into a cling stamp, ready for use with an acrylic block. The cushioning is important to get good ink transfer. Here’s how to mount your stamps using EZ Mount:
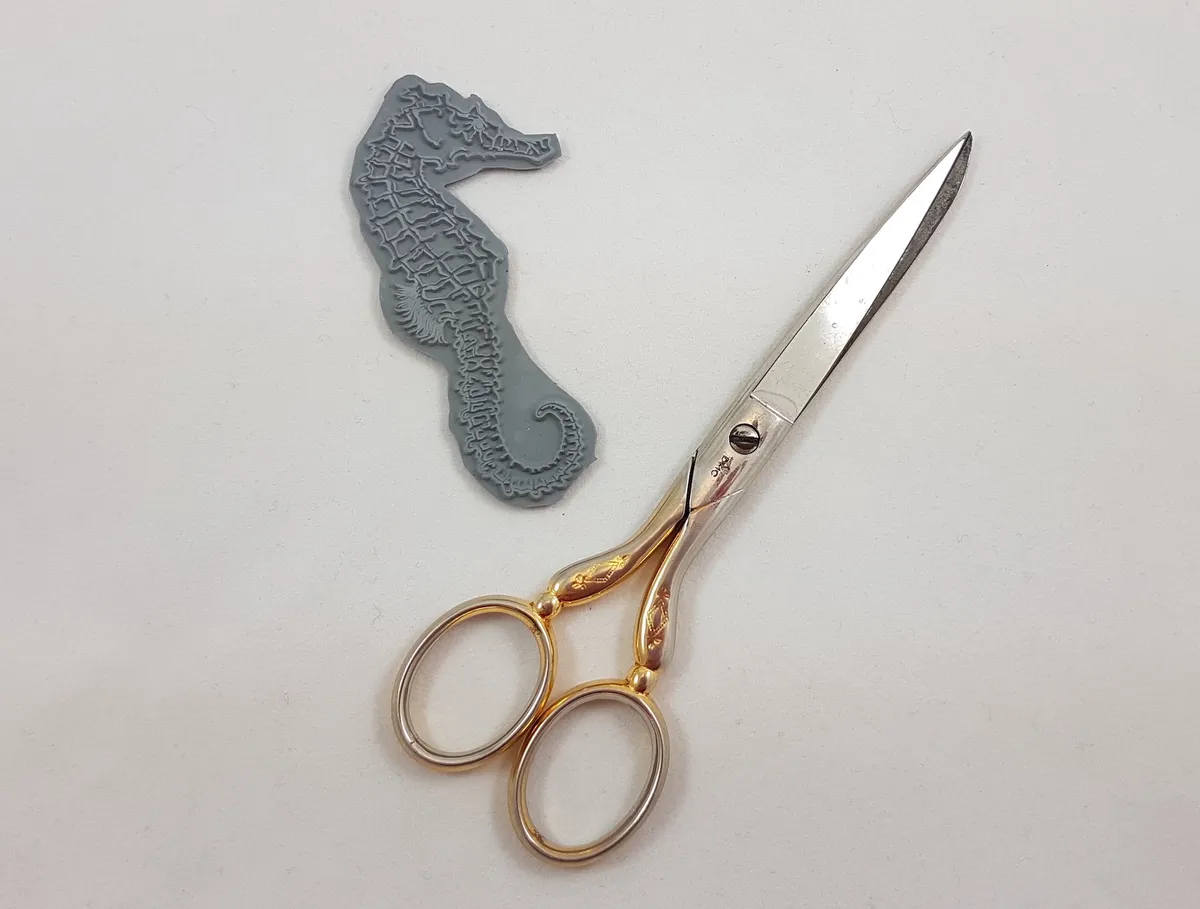
Step 1
Start by trimming the rubber sheet closely around the outline of the shape, using sharp, heavy-duty scissors, so there’s no excess rubber. Take care not to cut too close which would damage the design.
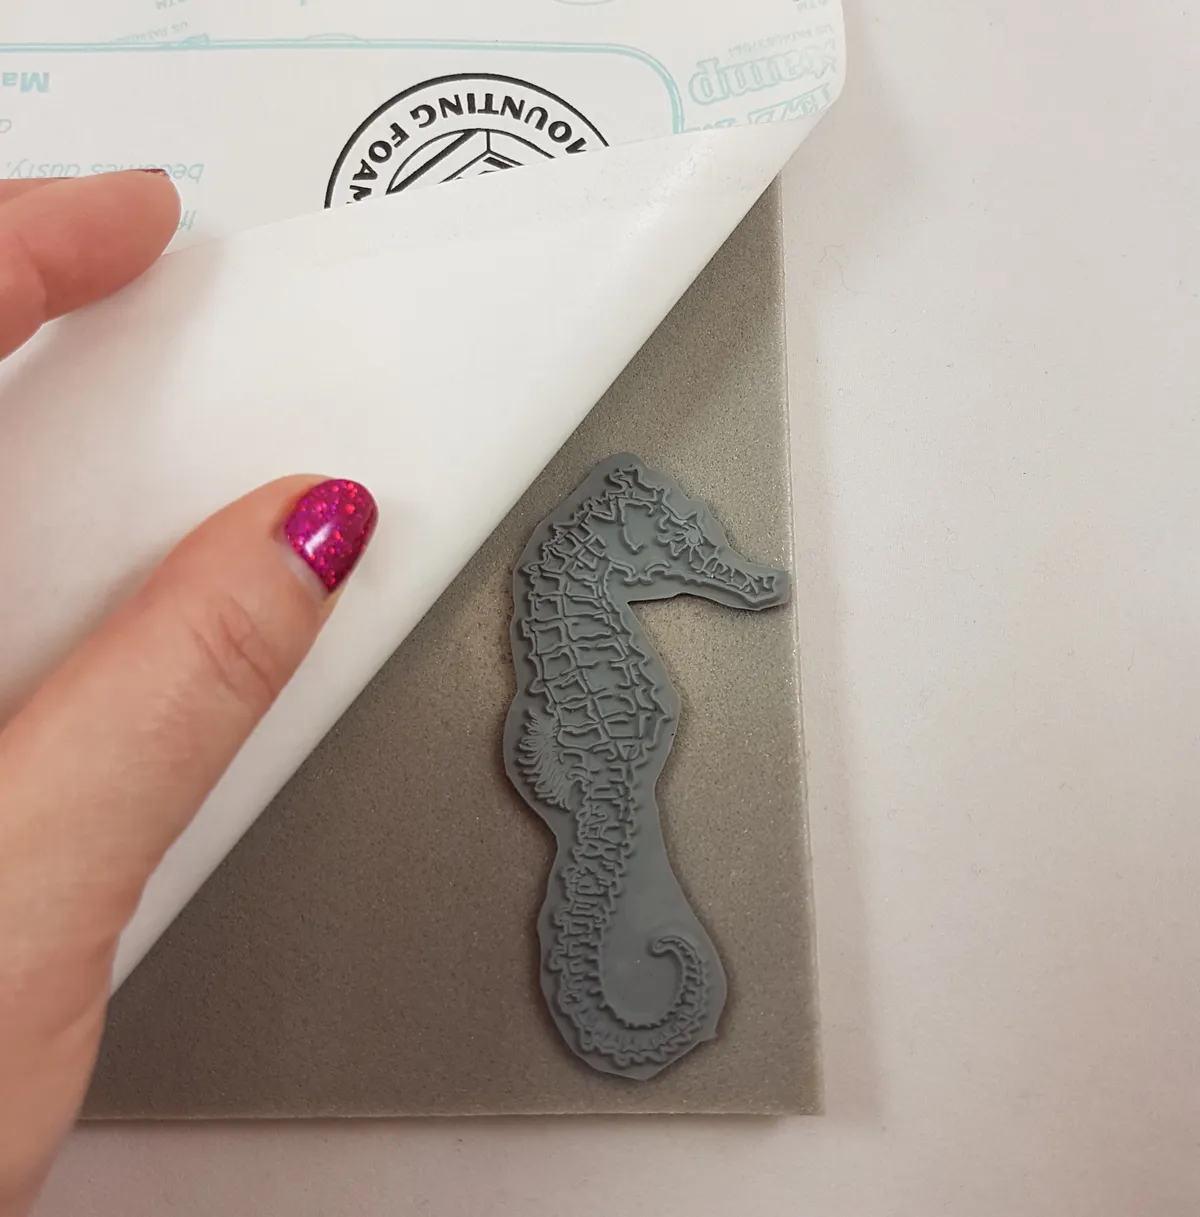
Step 2
Make sure the rubber surface is clean and dry, ready to apply the EZ Mount. Peel away the printed backing paper of the foam sheet far enough to stick down the back of your trimmed rubber stamp.
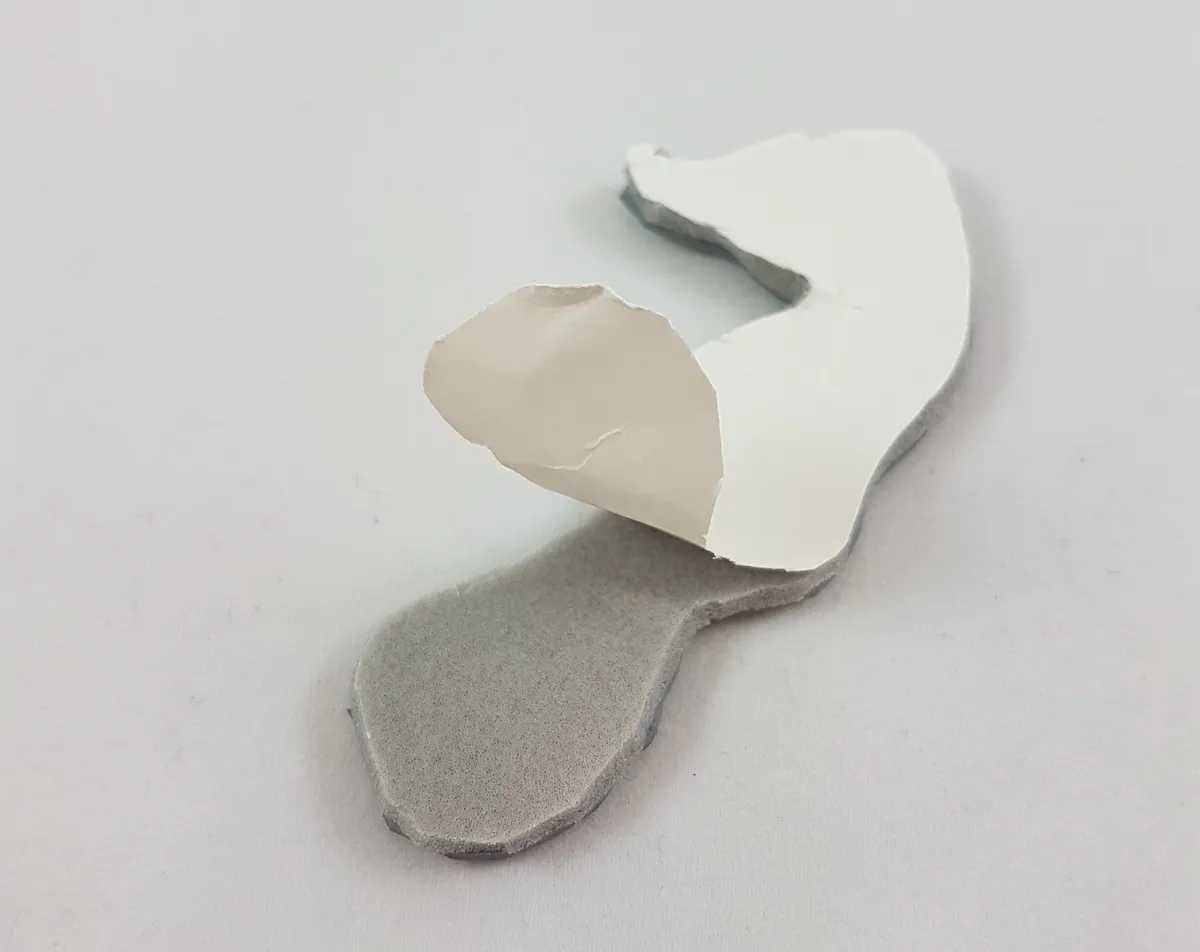
Step 3
Once your stamp is firmly stuck down, trim the EZ Mount around the stamp and peel away the liner of the cling side of the foam. The surface left exposed on the back is cling-friendly and ready to use.
Buy some Mount n’ Stamp foam!
How to care for your stamps
Once you’ve finished using your stamps, always give them a good clean to remove any ink residue. To clean your stamps, dampen a cloth with warm, soapy water and carefully remove all the ink from the stamps, making sure to remove it from all the detailed areas. Make sure to fully dry your stamps before storing them.
- Always clean clear stamps with water or a stamp cleaner after each use. Make sure they are fully dry before storing them.
- For wood-mounted stamps, never use running water to clean them as this can break down the adhesive and the rubber will start to peel away from the wooden block.
- Alcohol-free baby wipes are an ideal way to clean most stamps.
- Keep your stamps away from direct sunlight, as this can cause red rubber stamps to become brittle and crack and discolour clear stamps.
How to store rubber stamps
Keeping your rubber stamps flat is essential for prolonging the life of your stamp collection. An easy way to do this is to mount them on their original acetate sheets, then store these sheets in A4 plastic wallets, inside a lever arch file. You can easily flip through your stamp collection, and they’ll stay protected until you need them. I find it’s useful to slip a white sheet of A4 paper into each plastic wallet, so it’s easier to see the stamps.
Once you have built up a collection, and they’re spilling into multiple lever arch files, you might like to organise them by occasion: birthday, Christmas, anniversary etc.
You could also store your smaller stamp sets in empty CD, or DVD cases for the larger sets. Once you remove the plastic inserts, the stamps will stick easily to the acrylic covers. They are easy to label, and you can see the contents clearly, and you can store them easily on a bookshelf or in a CD/DVD rack.
If you prefer to buy ready-made stamp storage, we’ve got you covered:
Rubber stamp storage: Plastic storage
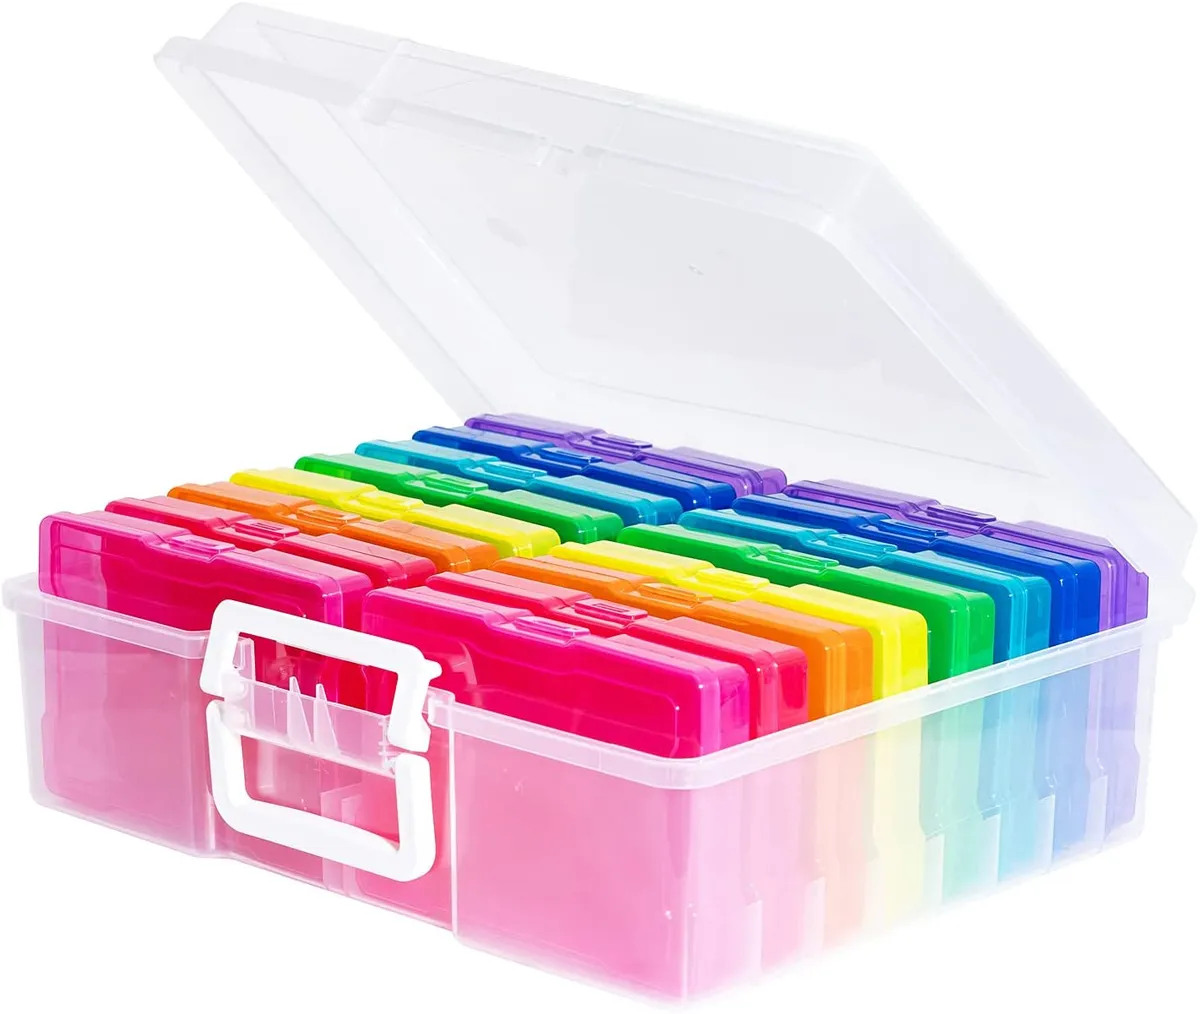
Keep it colourful with a dedicated storage container, like this Novelinks transparent storage case. It has 16 inner cases, each measuring 4 x 6" (the same as a standard photo), so it's ideal for keeping stamps organised, particularly those where the original packaging has long since vanished. If you're after furniture storage head over to our other article on the best craft storage solutions.
Rubber stamp storage: Folder

You can use an ordinary lever arch file with A4 plastic wallets, or if you want something that has been designed for use, DoCrafts have made this nifty wallet. It zips up around the edge, so your stamps are kept nice and secure. It's a deep folder so you can store lots of stamps, and has a nice, sturdy construction.
Rubber stamp storage: Inserts
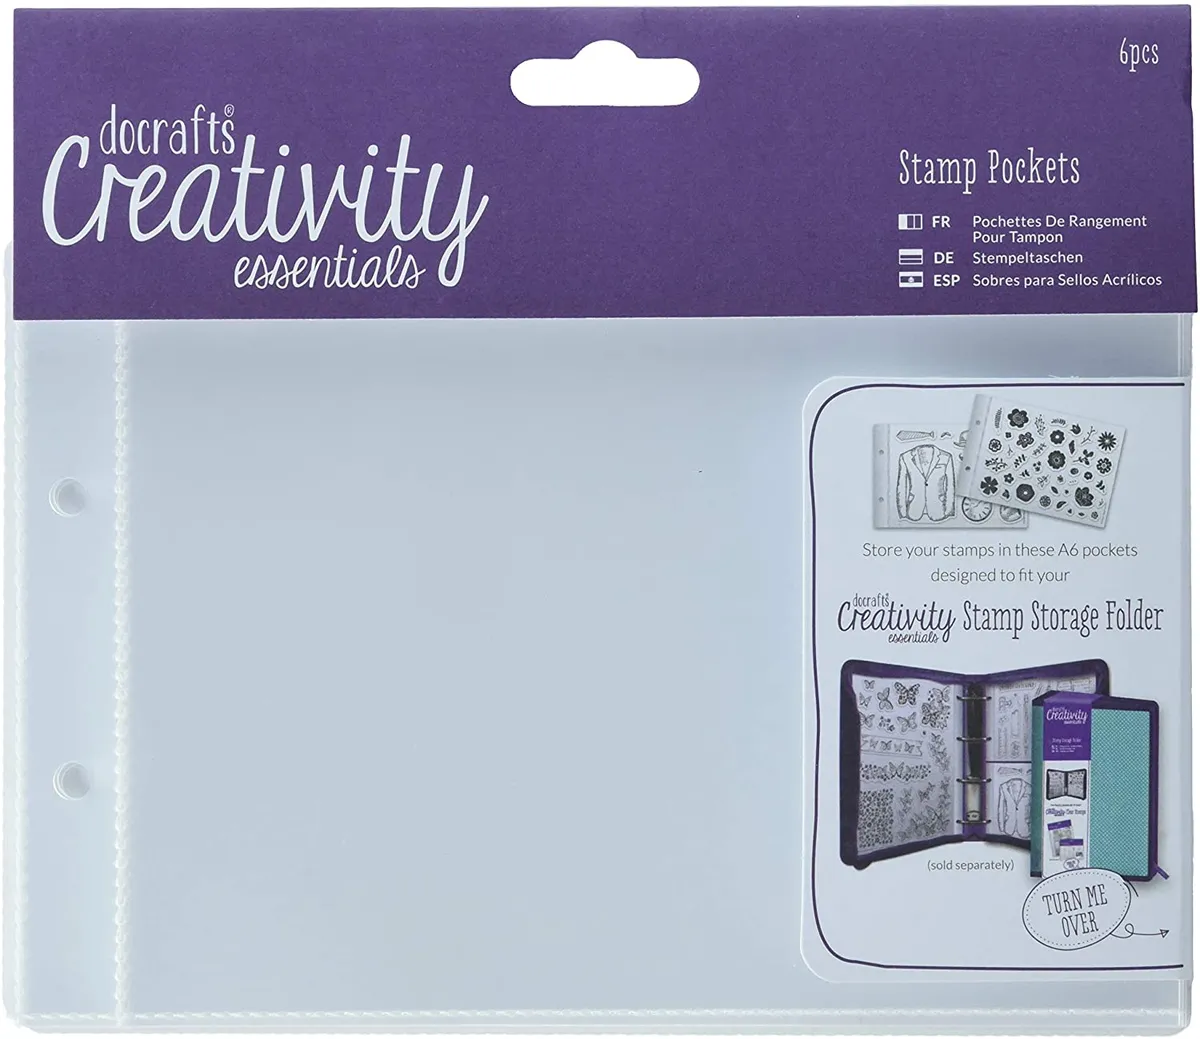
There are multiple different sizes of inserts available, these ones are A6, and fit the smaller stamp sets. Check out our round-up of card sizes if you need a reminder as to what size is A6.
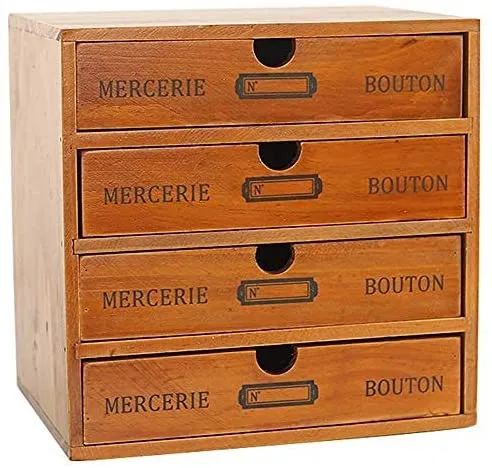
Rubber stamp storage: Vintage chest
If rummaging is more your style, then a vintage-style table-top chest of drawers could be just what your craft room needs. Sort your stamps and designate each draw by occasion, for example, birthdays in the top drawer, alphabet stamps in the second drawer, and so on. You could always add decoupage elements or paint it to suit your craft room!


